Not a Self-build, but a Tweaker

wildebus

Forum Member
Swapped out my Cello 20" TV for a 24" Avtex Series 9 Pro last week.
One of the key features I chose this TV was it has two HDMI connectors.
Going to use one for a Firestick ...
1623085324894.png


And the other one is for a Mini-PC which can be used for general browsing but a key purpose will be to use my Sky Subscription without a Dish
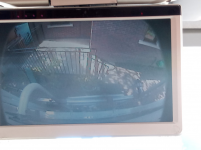
1623085472174.png


This has a problem however :( Windows users will probably see from this zoomed in shot ...
1623085606477.png

The screen is overscanned at the default 1920x1080 Full HD Resolution - the tell-tale above is the date under the time has been cut off. And at the top the window controls (minize, maximize/restore and close) are nearly cut off, which IS a pain.
I think this would be a problem for anyone with one of these TVs in fact.

The following shows the issue in more detail and how I fixed it on MY PC (another one may be different, so might have to find an equivalent setting on another one).
So the issue in more detail:
This is the settings at the Avtex's native 1920x1080 resolution. You see the display sides cut off on all the sides
1623086054821.png


You can choose a lower resolution to get round the problem. But there is a massive amount of wasted screen space doing this.
1623086189873.png

What I did with my PC is go into the Custom Resolutions tab, enter the defaults (1920, 1080, 50Hz) and then use the slider to find a new resolution that the TV will accept (it is fairly limited) and fills as much of the screen without spilling over the sides

And I ended up with a rather unusual resolution of 1832 x 1030 and 59Hz
1623087058389.png

and the screen is decently filled :) some more pixels would have been nice but this was the best one that the system would accept and looks fine for my needs (y)

Next mod in this area was for the PC Power. Comes with a 240V AC to 5V DC adapter (so USB voltage levels), but the current is 2.5A so more than the typical USB Port. So made up a little box with a neat 12V-5V adapter
1623087453242.png

I use this nifty little converter - https://amzn.to/2T3VrKg. Rated at 5A, so plenty of leeway for a 2.5A demand, and as well as having standard connectors for 12V Jackplug in and USB Port out, it also has screwdown terminals for In and Out as well, so a very flexible little unit).

Added a little rocker switch so can turn it off without having to unplug it from the socket
1623087633656.png

Whole thing very easy to do with minimal of tools or electrical know-how

And placed behind PC that is stuck to back of TV
1623087735927.png


Where the TV is placed I have just one 12V outlet - a combo TV12V and Aerial socket. And not only do I need more, the position of that socket stops me putting the TV against the corner as the plugs stick out :(
So added a triple 12V adapter fed by the original 12V socket for the plugs and also swapped the aerial lead for a right-angled one to allow the TV to go much more flush.
1623087957335.png

I would have liked to use CBE fittings there to match but the side panel was a touch too slim for the cover to fit. Hidden by the TV anyway so no big deal.
The two sockets are for the TV and the PC (the Firestick is driven off the TV, so when the TV is off, the Firestick is off (I think!)), which leaves a spare socket? The third socket is available for something like a SmartSpeaker (Amazon Echo for example) or maybe a Soundbar for the TV, which seems a popular add-on, so just a bit of future-proofing there.

There is the question of is it ok to run 4 12V sockets off of a connection originally used for 1? A good question and I am happy with it for the use I have. The TV is low power - certainly I am sure lower power than the TVs that would have been around when this motorhome was brand new, and the PC is a remarkably low 12.5W so that is tiny. An Echo is a tiny power consumer - less than the PC and the Avtex soundbar is also very little at under 1A at 12V, so the total maximum is not a great deal at all.
The actual original cable was also pretty substantial - 2.5mm2 at least so well up to the current drawn here, but I certainly wouldn't be wanting to be using all 4 sockets at their nominal design current of 10A each!
 

wildebus

Forum Member
I mentioned an issue with the PC display overscanning on the Avtex in an earlier post (see a very brief summary below)
This has a problem however :( Windows users will probably see from this zoomed in shot ...
1623183454063.png

The screen is overscanned at the default 1920x1080 Full HD Resolution - the tell-tale above is the date under the time has been cut off. And at the top the window controls (minize, maximize/restore and close) are nearly cut off, which IS a pain.
I think this would be a problem for anyone with one of these TVs in fact.
I called Avtex about this problem yesterday when I found it and they advised there were no settings to adjust this on the TV and would need to adjust the PC - so this is what I did as per my earlier post.

But then I noticed the Firestick had the same issue and there was no way to adjust that, so decided it was just not right and needed to delve deeper into the Avtex options ....

And found the setting to fix it (y)
You go into the menu, into the settings, and then 'User Setup'
The Aspect Ratio default is "Auto" - that results in an overscanned picture (maybe deliberate as sometimes you did used to get those visible scanning lines top and bottom on some transmissions), but if you change the settings to "1:1" you get a true 1920 x 1080 image
1623183953165.png

It looks like these settings are set for each input, so I had to select the first HDMI input (Firestick), into the menu and make this change; then select HDMI 2 (PC) and repeat the setup process.

So that is that sorted out - but I won't deny I am a bit disappointed at Avtex for not being able to advise me of these settings to start with :cautious:
 

SquirrellCook

Forum Member
I mentioned an issue with the PC display overscanning on the Avtex in an earlier post (see a very brief summary below)

I called Avtex about this problem yesterday when I found it and they advised there were no settings to adjust this on the TV and would need to adjust the PC - so this is what I did as per my earlier post.

But then I noticed the Firestick had the same issue and there was no way to adjust that, so decided it was just not right and needed to delve deeper into the Avtex options ....

And found the setting to fix it (y)
You go into the menu, into the settings, and then 'User Setup'
The Aspect Ratio default is "Auto" - that results in an overscanned picture (maybe deliberate as sometimes you did used to get those visible scanning lines top and bottom on some transmissions), but if you change the settings to "1:1" you get a true 1920 x 1080 image
View attachment 4008
It looks like these settings are set for each input, so I had to select the first HDMI input (Firestick), into the menu and make this change; then select HDMI 2 (PC) and repeat the setup process.

So that is that sorted out - but I won't deny I am a bit disappointed at Avtex for not being able to advise me of these settings to start with :cautious:
Since when have technical support staff understood the products they represent?
 

wildebus

Forum Member
Since when have technical support staff understood the products they represent?
I guess I expected better as read some comments on a couple of forums about them being very good (and when I worked on Tech Support, I used to know my products better then the customers (always a good start :D ))
I was tempted to call them after I found it today, but decided sod it, fed up with calling suppliers to give THEM correct info (would be the 4th one in a week) - it is meant to be the other way round! :mad:
 
Last edited:

xsilvergs

Forum Member
I had better luck with Avtex and for the issue I had was told to select 1:1 for the aspect ratio. What I hadn't appreciated was that each 'Source' has its own 'Setup' menu e.g. that setting 16:9 in TV doesn't affect the other 'Sources', unlike our TV at home.
 

wildebus

Forum Member
Having independant settings for a source is definately a bonus.
I find the Avtex manual pretty poor I have to say - it doesn't mention these options, and as far as going into the general "User Setup" it says something like "go to 'User setup'" but doesn't explain how you do that. For people who are not that familiar with this kind of technology, it is a poor show.
 

SquirrellCook

Forum Member
Having independant settings for a source is definately a bonus.
I find the Avtex manual pretty poor I have to say - it doesn't mention these options, and as far as going into the general "User Setup" it says something like "go to 'User setup'" but doesn't explain how you do that. For people who are not that familiar with this kind of technology, it is a poor show.
Customers are not supposed to fiddle, they are not qualified. ;)
 

wildebus

Forum Member
Customers are not supposed to fiddle, they are not qualified. ;)
Actually the guy I spoke to (who said, nay insisted, there were no adjustments possible) gave me the "special" 4 digit code to get into the manufacturers setup to try something or other, but said it would make no difference and I didn't try it anyway (forgot the code!).
 

wildebus

Forum Member
I was intending to sell my Garmin Camper Sat Nav and use the built-in SatNav on the dash system that uses Google Maps, but after I used it the other day when out, it was a bit frustrating with the 'noise' you get with Google Maps with the links and stuff covering up half the map :(
Plus the Camper version can be good for stuff like width restrictions and so decided to get it fitted :)

Plus, it also gives me the Camera Options which are handy (y)
The Cheyenne has a backup camera with a high level mounted camera pointing down, but the display, despite being nice and big, is not very visible to use.
1623509203135.png


In contrast, the Garmin Camera, which I fitted at numberplate level gives quite a different angle and also has the benefit of (adjustable) guidence lines and much better visibility.

This is the position I choose for the Display
1623509600124.png

Pretty well in the standard rear view mirror location, so nicely out the way and power is routed via an overhead console.

And when it is showing the Backup Camera view ....
1623509164980.png


Plus I have a second camera, pointed directly back to work as a rear-view mirror which will be handy for general driving.
1623509429513.png

The Cameras I bolted to the Numberplate and routed the power to a rear light cluster
1623509866543.png


Bit of a comparison ... original Backup and new Backup displays "side by side" - so I could use both, which could potentially be useful in some situations as the views are different.
1623509798741.png
 

Attachments

  • 1623509119750.png
    1623509119750.png
    1.3 MB · Views: 139

mb2tv

Forum Member
This is very nice!
I have not ordered the van with satnav, as has not read good reviews. Although build in satnav has an advantage (well, at least on my current Toyota) as it continues to work when there is no gps signal, by measuring the distance traveled by the wheels. Disadvantage is it is VERY expensive, and if it goes wrong... which mine did, but under warranty). So either Waze/google, or will buy as suggested above a separate Garmin system. I am not sure I will be able to match the very nice installation you did.
 

wildebus

Forum Member
The "proper" Built-in Sat Navs are nice because they are connected to the vehicles Speed signal - so like you say, carry on working without a satellite to a good degree, so great for tunnels :) but in truth, it is a minor benefit because the places you don't get a signal (like tunnels or mountain passes) there is not a lot of choice on the roads.
Downsides as well as the initial cost if an option is the rediculous map updating cost. I have "Android Auto" on the cars head unit and can use Google Maps with that - that works well and a lot less clutter (I think Android Auto is tuned more for a clean display for driving than a tablet using Google maps is?).

It is a personal thing in terms of the different Sat Navs I guess, but I keep gravitating back to Garmin as my preferred style. Maybe familiarity, but it just seems so logical and spot on to me, compared to the others? (Google Maps when 'clean' is nice as well with the on-line searching).
I have no doubt you could install something just as neat. The cameras are just linked to a light cluster and wireless to the display. The Power for the display is via a connector to roof lights to avoid a lead hanging down.
It is good having the one display for Sat Nav and Cameras to avoid too much clutter. It does work out pricier compared to a Standalone SatNav and another display for a camera but so much tidier.
 

wildebus

Forum Member
Tried the newly installed Garmin in the Motorhome last couple of days on a trip away and around 150 miles.

As a Sat Nav System, I really do prefer it to the Google Maps, not least as I can actually easily see it! I don't wear any glasses for Driving but I do for reading and to use the Dash system (which is essentially an Android Tablet display) I need the glasses on.
But the Garmin unit is designed for use when driving. (this is one reason why I am not a fan of the "don't waste money on getting a Sat Nav, use your phone" argument).
As a Reversing Camera, it is definately better than the factory fit setup. The visibility is much better and having the guidence lines is very useful.
As a Rear View Camera, it certainly works but is less successful. You get a very slight refresh pause going on. Calling it a stutter is too much, but it is not a totally smooth view as you would see in a mirror and is not present in the reversing camera. I am guessing it is a video bandwidth thing as there is lot more changing. It is also a case of "objects in mirror are closer than they appear" and very much so. I think it will be useful in many circumstances still as there is a bit of a blindspot on the drivers side due to the way the mirror can be positioned and how I have to set my seat, so this could be a useful extra aid.
 
Last edited:

wildebus

Forum Member
I ordered a Tabletop for my Lagun Table from a specialist campervan carpenter (https://chippysworkshop.co.uk/).

Not sure what finish I wanted and in the end opted for a top with a Dark Walnut Finish on one side and a Pale Walnut on the other to kind of echo the Light and Dark finish I have on the top cupboard doors. It is not as close a match as I hoped for (limitations of cameras and monitors to use to compare) but still a pair of nice finishes.

1624035706006.png


1624035718276.png


And the interior
1624036366722.png


I will need to select which finish I decide to have on top as the Lagun support plate gets screwed on underneath the tabletop so can't just swap it over if I change my mind.

Initially I was thinking of having the darker finish on top, but maybe veering to the lighter instead? What do people think? (cat demanded to be included in the shot!)

PS. Little matching corner quadrant is for something else which chippy made for me at the same time ;)
 
Last edited:

wildebus

Forum Member
Now onto the table mount ...

View attachment 3882

So Mounting is complete!! yea - only 6 months after buying the kit!

Unsure what kind of tabletop to have at this stage apart from where to fit the mounting plate. Could go very traditional with a standard wood effect to match and blend in with the vans woodwork.
Or could go a bit more funky? I like this guys work and have seen it "in the flesh" also and is nice quality - https://chippysworkshop.co.uk/

To finish off this thread, I did get a tabletop from Chippys Workshop (https://chippysworkshop.co.uk/) in a wood effect top and bottom. Originally thought I would have a rectangular top but went for a round top instead - size is 55cm.

Decided to have the pale walnut on top, so fitted the mount on the dark side.
1624095107233.png

The mount is fitted off-centre to allow maximum flexibiliuty of the Lagun system.

Then just a matter of dropping it onto the mount. The following series of photos are just with the top in a few different positions. It is infinitely variable in the positions for both top and bar. The Zebra on top always faces the same way on the tabletop and shows how the table is turned round along with the support bar position
1624095267455.png


1624095311735.png


1624095367621.png


Each connection point has a locking lever so you can leave it loose to make it easy to position, tighten it a little or properly lock it down.
You don't have to have the seats turned to use the table system either - this shows the tabletop in place with the front seats in travel position (it is not touching the seat back here BTW).

1624096604517.png


As well as being able to spin the top around and adjust the horizontal arm to the position you want as shown above, you also have the height adjustment to suit what you are using the table for on each occasion.
1624095399937.png
1624095434183.png


The Lagun is not a cheap table system for sure, but the quality and flexibility of the system makes the extra cost over a basic bent pole system worth it IMO.
 

Attachments

  • 1624096281763.png
    1624096281763.png
    2.5 MB · Views: 133
  • 1624096512879.png
    1624096512879.png
    2.8 MB · Views: 151

wildebus

Forum Member
I bought a couple of HDMI and micro-USB adapters that turn the connectors 180 degrees, which means can hide the cables neatly behind the screen.
I was planning on mounting the screen to the wall as mentioned, but with the new cable adapters, I am tempted to just leave it where it is as it is nicely tucked away and saves drilling holes in the woodwork ...
1624141872899.png


What you guys reckon? Wall-mount or leave where it is?
When I got my new tabletop for the Lagun Table Mount, I also asked the guy to make a little matching corner shelf which I could put the display on.
He made it just the size I asked, but it could have been a touch bigger really in hindsight.
1624141769017.png
 

wildebus

Forum Member
Stuck my new VIN Plate on today (y)

1624210815249.png

Extra 350Kg to play with now :D
Going to the weighbridge tomorrow to get a current idea of how much the Motorhome comes in at with a full load of water and a full tank. Then the difference will be there to accomodate two occupants, a few clothes and a pair of eBikes and whatever might go sit on the Thule Easybase :)

Need to send the V5C to DVLA to get the weight updated as well. I think I am ok to run to the new weights whilst waiting for the updated V5C as long as the request has been sent? (could be relevant as DVLA staff are apparently in a dispute and it can take many weeks to get requests completed).
 

wildebus

Forum Member
Sorted out what I think is a bit of a confusing design feature on my Autotrail Motorhome - and one that will apply to many Autotrail (and similar) Motorhomes I think?

I have an Autotrail "Hi-Line" Cheyenne. And in Autotrail speak, "Hi-Line" means an overcab bed. I specifically wanted this feature as I see it is a useful space-saving feature giving what is a permanent bed as well as extra daytime storage.
You access the bed via a ladder of course.... (cue photo of ladder ;) )
1624265557144.png


Pretty standard stuff, so what is the issue?
Well, when you have a front lounge layout like my Cheyenne, the sofas pull together and convert into a double bed (making this a 4 berth motorhome). The problem is that when you pull them together, you can no longer put the ladder in place.

This shows one half pulled out ready for the other side to come out and already the ladder cannot be put in place
1624265888606.png


So how when the lower bed is made does someone get to the upper bed? I suppose some climbing on the cab seat back possibly but it doesn't look that easy! maybe put the ladder feet on top of the lower bed but be a funny angle and where does the ladder go after the occupants are up top?
I really am not sure what Autotrail expect people to do here (maybe there are instructions in the handbook but I can't imagine what the recommendation is :unsure: )

Now the interesting bit ...
The lower bed when made up is 2.4M by 1.2M - which is a 'small double' in width but a very long bed. This is comprised of a long sofa on the right combining with a short sofa on the left to make up the bed.
However, if you pull out the long sofa (as shown in the photo above), you end up with a flat bed of 1.2M wide and around 2M long. Unless you are significantly taller than average, it makes very little difference if your bed is 2M or 2.4M long (I am just under 6 foot and I can lie on this sofa without any problems), so making up just one side of the sofa is (IMO) just as good as making up the two together, PLUS you also still have a two-seater sofa you can sit at even with the bed made up, which is handy.

The key benefit of doing the lower bed like this is the upper bad ladder though!
With the right sofa fully extended to make the bed, there is still room - just! - to put the ladder in place
1624266746782.png

So all that is needed to do is to move the two ladder support clips over to the new ladder position and it is fully usable and you have the 4 berth layout actually usuable
1624266859543.png

I just need to get something to cover up the holes left by moving the screws and it will look spot on.
 

Tookey

Forum Member
We have the same issue but no way round it like your solution. Presently we can lift the boy up and my wife climbs using a surface and the ladder stays at home due to the sofa already in 'bed mode' as that's where we lounge in the evening and then I sleep there. Actually its my only complaint about what is an exceedingly well thought out design but in fairness you've seen the size of ours and I do wonder what alternative, if any was available to them
 

Users who viewed this discussion (Total:0)

Top