SquirrellCook
Forum Member
It makes such a mess and often you can't get to the bit most needing it. I'll trim away anything I consider too far gone and chemically treat the rest.A lot of shotblasting required here and there.

It makes such a mess and often you can't get to the bit most needing it. I'll trim away anything I consider too far gone and chemically treat the rest.A lot of shotblasting required here and there.
 ) to Betty. I mentioned some time ago much of the water ingress into the habitation area was due to the fact the bonding between the windows and body was failing. A few weeks back my window man came to visit and said he was more than happy to remove a pain to two, give us a couple of days to do any repairs and then rebond the glass or replacement panels depending on if we are keeping glazing at that location.
Not to bad Dave, I intend to leave mine on all the time to keep damp at bay. No electrics as yet, but as it’s going to be all 24volts dc dc converters will be required upping the consumption a bit. Forgetting the cost I expect multiple dc dc converters will make sense depending on how much each 12 volt item is used. Rather than one big converter left on all the time. Lots to think about on a new build rather than an evolution of a vehicle in use.Nice install. I had just one tiny leak from my Maxxfan install - through one of the screws via capillary action. Nipped up the nut and jobs a good 'un.
I know you like to keep an eye on your electrics ... I did a check on the power consumption of the fan at the different power settings. These are the results I got for mine. I'd expect yours to be very similar.
Maxxair Power Consumption by David, on Flickr
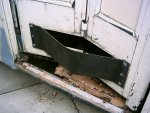
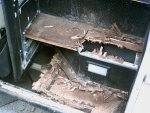
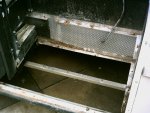
To be honest we are surprised how good it is. What's worrying is that if we had bought a newer one this was still going to happen. All our hard work would have been ruined. Remember the owners of these things just want to make a profit, bodge it and get it back on the road. Plaxton kindly gave me the parts and maintenance manual for it. If any one would have followed the care instructions it would have been even better. Two things too look for. 1. Condition around the entrance step. These get a hammering from the road and passengers. 2. Boot repairs, sure sign that it's had a water/damp problem.Have to say what you are coming up against and finding puts me off the idea of buying an old bus (I did like the idea initially).
I was a coach driver for 24 years and I can tell you, some of the bodges carried out by back street company's were appalling. One of the big problems with Plaxtons was the draft coming in from the front over my legs, so in winter I had a travel blanket I put over my legs to drive, passengers did give me some odd looks. Another problem was the electrics, instead of tracking down faults,the leccy would just run another wire round the problem, so you could end up with wiring that made no sense whatsoever. You're doing a cracking job, and good luck with the build.To be honest we are surprised how good it is. What's worrying is that if we had bought a newer one this was still going to happen. All our hard work would have been ruined. Remember the owners of these things just want to make a profit, bodge it and get it back on the road. Plaxton kindly gave me the parts and maintenance manual for it. If any one would have followed the care instructions it would have been even better. Two things too look for. 1. Condition around the entrance step. These get a hammering from the road and passengers. 2. Boot repairs, sure sign that it's had a water/damp problem.
One of the big problems with Plaxtons was the draft coming in from the front over my legs, so in winter I had a travel blanket I put over my legs to drive
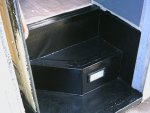
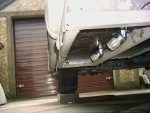
I used trailer flooring from indispension Trailers,also shortened the top step so i could do away with the rubber flap in the door & plate over, who ever thought that one up,also under door lights controlled from remote key ring,handy at night.I was lucky Trev, as the step box it's self was a reinforced glass fibre moulding. The step inside it is as yours and showing signs of rot like yours. The new one will be made in Buffalo Board. I'm hoping this new step will also be the D4 eberspacher home.
I got a sample of new plastic recycle board which is a new kid on the block,but the co selling it only sell 10 boards at a time to trade,sample is about 20ml thick and black in colour,looks the bogs dollocks.Same sort of stuff Trev. Phenolic resin coated plywood. May well be bonded that way too. For any floor that has any chance of ever getting damp this is the stuff. Shower rooms too.