Well I’ve gone & bought our next van.. although it’s not a van yet!

Darcar

Forum Member
This looks really good, great work so far. Just to clarify, are you referring to attaching the neoprene (wetsuit material) to the wood lining in the walkthrough area? And is this intended to reduce movement between the cab and box of a vehicle?
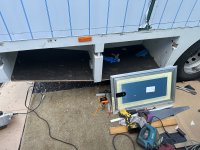
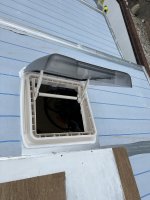
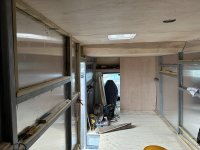
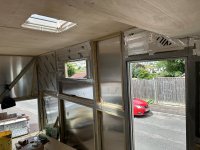
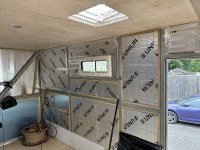
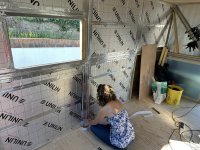
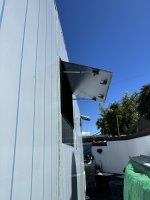
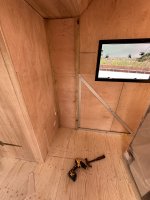
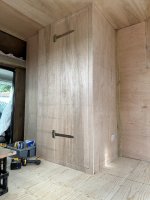
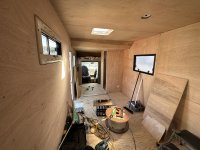
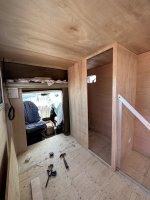
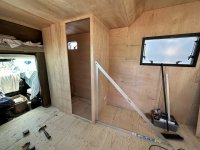
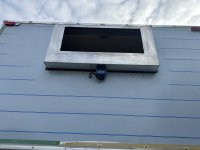
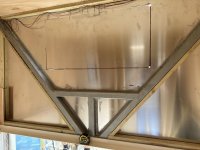
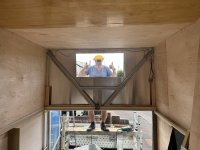
yes… well because the box and cab are about 50mm apart at there widest. I intend to fix wood to the inside wall of the cab & the outside wall of the box. The cab & box won’t actually touch but the neoprene will bridge the gap, being fixed to the inside of the cab and the box, this should be able to take up the difference in the movement.
hopefully 🤞😂
 

Duckato

Forum Member
@Darcar
That’s an interesting bit of fabrication only striking thing me is the extensive rear overhang with no departure angle, but obviously that would only be a problem in rare circumstances.
 

Darcar

Forum Member
@Darcar
That’s an interesting bit of fabrication only striking thing me is the extensive rear overhang with no departure angle, but obviously that would only be a problem in rare circumstances.
Yes It is very low, which has bothered me from the off.. but it’s been used for the last 4/5 years and there’s no sign of grounding!
However I have now cut the overhang to give me a departure angle. As I think that this would be the most valuable area? The body is made from plastic and is very easy to work with.
I had the hatch doors made to fit the holes where I removed the old sandbag storage from, & just put in new bottoms.
 

Attachments

  • IMG_0877.jpeg
    IMG_0877.jpeg
    3 MB · Views: 135
  • IMG_0916.jpeg
    IMG_0916.jpeg
    3.8 MB · Views: 113
  • IMG_0917.jpeg
    IMG_0917.jpeg
    3.5 MB · Views: 116
  • IMG_0930.jpeg
    IMG_0930.jpeg
    3.1 MB · Views: 109
  • IMG_0932.jpeg
    IMG_0932.jpeg
    3.7 MB · Views: 108
  • IMG_0978.jpeg
    IMG_0978.jpeg
    2 MB · Views: 116

Darcar

Forum Member
What plans do you have to smooth off the sides to give your amazing creation an overall more finished effect?
The aluminium sheeting is glued & riveted to the steel box. It’s overlapped on each joint so there is a step on all the joints. I’ve run a beed of sikaflex down each seem which has smoothed this out somewhat.
we‘re still not sure whether we’re going to wrap the entire thing or paint it?
The aluminium would be too shiny just to leave or polish… it’s blinding now in the sun. That’s why I’ve left the plastic covering on…
As soon as the weather allows I’m going to brush paint the roof in a light colour, to see how that goes!
cheers Darren..
 

Pudsey Bear

Forum Member
I had a Luton Transit in the 80s as my first haulage van, it was in good nick but had a tatty-looking aluminium box, I bought a couple of pints of coach enamel and a sponge roller and painted it, as coach enamel is slow to dry it flowed out nicely and there were no marks at all, a few gnats had landed on it as I did it outside which wiped off once it had dried fully but it looked really good, it is of course how they did it before compressors and spray guns were available, and didn't cost thousands of pounds.
 

Darcar

Forum Member
Flooring now screwed down, on top of the insulation. We’ve put in one skylight going to put the ceiling up tomorrow.( if the solar panels arrive in time..)
After working on panel vans in the past, this aluminium is a pleasure to work with, & flat square sides & ceiling makes it very simple.
 

Attachments

  • IMG_1060.jpeg
    IMG_1060.jpeg
    1.6 MB · Views: 93
  • IMG_1058.jpeg
    IMG_1058.jpeg
    1.5 MB · Views: 89
  • IMG_1055.jpeg
    IMG_1055.jpeg
    1.3 MB · Views: 97
  • IMG_1043.jpeg
    IMG_1043.jpeg
    1.7 MB · Views: 98
  • IMG_1039.jpeg
    IMG_1039.jpeg
    2.1 MB · Views: 99
  • IMG_1040.jpeg
    IMG_1040.jpeg
    1.9 MB · Views: 104
  • IMG_1038.jpeg
    IMG_1038.jpeg
    2.4 MB · Views: 101
  • IMG_1062.jpeg
    IMG_1062.jpeg
    1.7 MB · Views: 103

Darcar

Forum Member
I wish that the weather would clear up…. I’ve been waiting for sunny days… got windows t fit!!!
we did manage to get the solar up on Monday between the showers…
 

Attachments

  • IMG_1124.jpeg
    IMG_1124.jpeg
    4.2 MB · Views: 94
  • IMG_1123.jpeg
    IMG_1123.jpeg
    2.8 MB · Views: 83
  • IMG_1122.jpeg
    IMG_1122.jpeg
    2.2 MB · Views: 87
  • IMG_1121.jpeg
    IMG_1121.jpeg
    3.4 MB · Views: 81
  • IMG_1120.jpeg
    IMG_1120.jpeg
    2.1 MB · Views: 118
  • IMG_1103.jpeg
    IMG_1103.jpeg
    3.2 MB · Views: 99
  • IMG_1131.jpeg
    IMG_1131.jpeg
    2.4 MB · Views: 95
  • IMG_1132.jpeg
    IMG_1132.jpeg
    2.4 MB · Views: 105
  • IMG_1139.jpeg
    IMG_1139.jpeg
    2.9 MB · Views: 111

JIXAMAN

Forum Member
Regarding the cab joint to the body, ah seen a youtube vid of a guy who converted an ERF lorry, if you search ERF cab tilt you will find him, he deals with it, may help... M, and the build looks amazing... Cheers...
 

Darcar

Forum Member
Regarding the cab joint to the body, ah seen a youtube vid of a guy who converted an ERF lorry, if you search ERF cab tilt you will find him, he deals with it, may help... M, and the build looks amazing... Cheers...
Cheers for that... we’ve done something similar now & I’m happy that it will be fine 🤞.
Fitting windows today if the weather allows!
 

Darcar

Forum Member
Well the weather’s been better the last couple of days…. So we’ve managed to get some windows in.
This truck is the first time I’ve worked with a aluminium bodied vehicle & it’s such a pleasure to work with, & of course having flat walls makes it so much easier.

Luckily we had a couple of windows in stock from a previous build! & I bought the big window on fb marketplace very cheaply. So we only needed to buy one new window a 500x800, it’s a copy of a seitz window & called “Adventurer“ & I must admit it’s very good quality and about 2/3s of the price..
 

Attachments

  • IMG_1178.jpeg
    IMG_1178.jpeg
    1.8 MB · Views: 83
  • IMG_1179.jpeg
    IMG_1179.jpeg
    1.4 MB · Views: 72
  • IMG_1180.jpeg
    IMG_1180.jpeg
    2.3 MB · Views: 84
  • IMG_1181.jpeg
    IMG_1181.jpeg
    3 MB · Views: 76
  • IMG_1182.jpeg
    IMG_1182.jpeg
    3.6 MB · Views: 87
  • IMG_1183.jpeg
    IMG_1183.jpeg
    2.2 MB · Views: 79
  • IMG_1186.jpeg
    IMG_1186.jpeg
    4.2 MB · Views: 75
  • IMG_1187.jpeg
    IMG_1187.jpeg
    3.3 MB · Views: 73
  • IMG_1188.jpeg
    IMG_1188.jpeg
    3.4 MB · Views: 82
  • IMG_1194.jpeg
    IMG_1194.jpeg
    3.9 MB · Views: 75
  • IMG_1195.jpeg
    IMG_1195.jpeg
    1.2 MB · Views: 86
  • IMG_1196.jpeg
    IMG_1196.jpeg
    2.6 MB · Views: 80

Darcar

Forum Member
We have had a good couple of weeks on the build.
Now got all but one ( the rear ) of the windows in. Finished the ply panelling, again except the back wall, as we‘er waiting on the bay window tray.
Liz went up on the roof and first coated the aluminium with an etching primer.

I’ve built the bathroom but we’ve not fitted the toilet or made the GRP shower tray.
also got the cabinet in for the thetford fridge.

we are fitting a oak sideboard as a kitchen unit. Obviously removing the oak top and going to replace it with a kitchen worktop for the sink to drop in.
 

Attachments

  • IMG_1228.jpeg
    IMG_1228.jpeg
    2 MB · Views: 68
  • IMG_1236.jpeg
    IMG_1236.jpeg
    3 MB · Views: 70
  • IMG_1235.jpeg
    IMG_1235.jpeg
    3.6 MB · Views: 79
  • IMG_1220.jpeg
    IMG_1220.jpeg
    4 MB · Views: 84
  • IMG_1227.jpeg
    IMG_1227.jpeg
    1.9 MB · Views: 69
  • IMG_1219.jpeg
    IMG_1219.jpeg
    3 MB · Views: 75
  • IMG_1218.jpeg
    IMG_1218.jpeg
    1.7 MB · Views: 71
  • IMG_1217.jpeg
    IMG_1217.jpeg
    2.8 MB · Views: 76
  • IMG_1216.jpeg
    IMG_1216.jpeg
    2.9 MB · Views: 83
  • IMG_1200.jpeg
    IMG_1200.jpeg
    2.8 MB · Views: 79

Millie Master

Forum Member
Are you keeping a close eye on the weight Darren?

I only ask as you make mention of an oak sideboard and oak, most especially solid oak is very heavy, but by the way you are going to end up with one very spacious interior and as for the size of the loo compartment, well it looks bigger than some VW campervans!

Phil
 

Darcar

Forum Member
Are you keeping a close eye on the weight Darren?

I only ask as you make mention of an oak sideboard and oak, most especially solid oak is very heavy, but by the way you are going to end up with one very spacious interior and as for the size of the loo compartment, well it looks bigger than some VW campervans!

Phil
Evening…. Phil.

we chose the iveco daily 7.2 ton chassis cab, so I wouldn’t have to worry too much about weight. I know it will have a bearing on fuel consumption but after our vario at 20 mpg. I’m hoping we’ll see some improvement!

My carpentry is fantastic and I find making cupboard doors & draws frustrates me, so I usually buy a solid oak cabinet and alter it to fit our requirements! this has worked well in the past for my builds.

Yeah we’ve decided to have a larger bathroom/toilet this time. We tend to use the shower a lot when off grid camping. It also doubles as a drying room for wet coats & dog towels.. 🤷🏼‍♂️👍
 

mark61

Forum Member
Evening…. Phil.

we chose the iveco daily 7.2 ton chassis cab, so I wouldn’t have to worry too much about weight. I know it will have a bearing on fuel consumption but after our vario at 20 mpg. I’m hoping we’ll see some improvement!

My carpentry is fantastic and I find making cupboard doors & draws frustrates me, so I usually buy a solid oak cabinet and alter it to fit our requirements! this has worked well in the past for my builds.

Yeah we’ve decided to have a larger bathroom/toilet this time. We tend to use the shower a lot when off grid camping. It also doubles as a drying room for wet coats & dog towels.. 🤷🏼‍♂️👍
Right choice of truck. You could probably go for granite work tops and still not worry about being overweight. Not suggesting you should, just saying you could :LOL: 
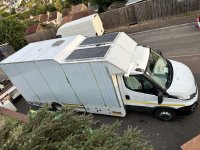
As you mention, it will take it's toll on MPG.
A mate who has a 7.2 tonne Daily is for ever pointing out, he could carry my van, fully loaded on his rear axle and still have spare.
 

Darcar

Forum Member
So we’ve passed the momentous stage of fitting the last full sheet of ply..
All the insulation and ply lining is now done.. the rear wall was the hold up, as we had to wait for the rear window box.
I have built a slide out bike rack, which just fits under the bed, the bed base is now in and we’re cracking on with fitting the kitchen unit & building the overhead cupboards etc..
 

Attachments

  • IMG_1320.jpeg
    IMG_1320.jpeg
    2.2 MB · Views: 72
  • IMG_1323.jpeg
    IMG_1323.jpeg
    3.4 MB · Views: 79
  • IMG_1328.jpeg
    IMG_1328.jpeg
    1.6 MB · Views: 68
  • IMG_1330.jpeg
    IMG_1330.jpeg
    2.5 MB · Views: 72
  • IMG_1349.jpeg
    IMG_1349.jpeg
    2.3 MB · Views: 77
  • IMG_1356.jpeg
    IMG_1356.jpeg
    2.4 MB · Views: 62
  • IMG_1369.jpeg
    IMG_1369.jpeg
    2.5 MB · Views: 73
  • IMG_1373.jpeg
    IMG_1373.jpeg
    2.5 MB · Views: 77
  • IMG_1294.jpeg
    IMG_1294.jpeg
    1.7 MB · Views: 78
  • IMG_1300.jpeg
    IMG_1300.jpeg
    2.7 MB · Views: 74
  • IMG_1302.jpeg
    IMG_1302.jpeg
    2.6 MB · Views: 78
  • IMG_1305.jpeg
    IMG_1305.jpeg
    2.2 MB · Views: 86
  • IMG_1313.jpeg
    IMG_1313.jpeg
    1.8 MB · Views: 85

Squiffy

Forum Member
Looking good, very interested to know how you set up that trestle your standing on, it would seem to be quite safe with you standing on it but photos of course are static. 😁 Phil
 

Users who viewed this discussion (Total:0)

Top