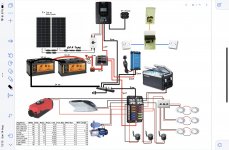
Right so I have updated the diagram.
I’ve added the fuse block to include the positive from the solar controller, mains charger and the distribution block all with their respected fuses.
Solar controller is 20a = 25a fuse
Mains charger 15a output = 20a fuse
Distribution block max output 37.33a = 40a fuse
I’ve added a NEG busbar to join all the NEG wires together.
CAT fuse added to POS terminal of 100a, 35mm wire for connecting batteries and from batteries to NEG busbar, POS fuse block and
Battery cut off switch.
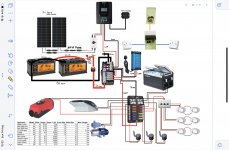
I've not used one of those little square battery post style fuses that you are showing before. meant to be very handy, so a good choice there
")
The fuse box you have to the battery - It maybe you are showing a blade fuse box for diagramatic purposes, but I would recommend using a Midi-style fuse box (I linked to one earlier). Blade fuses can be problematical, especially at the higher currents. the unit I linedk to also incorporates a NEG busbar so you can lose the seperate one you are showing (It is much more akin to the other 12V Blade fuse box you have in the diagram with the NEG block and LED indicators).
You are also a bit overboard with the cable sizes using 16mm to the chargers. They are much larger than needed and while going bigger than the minimum is generally a much better idea, you will physically not be able to connect cables of that gauge into some of the lower-current devices. For 20A Solar and 30A Mains, something like 6mm would be perfectly fine.
Using 16mm2 to the multiway Habitation Fusebox is not a bad idea though, especially as you have a Compressor Cooler and Diesel Heater. Both of those units have an initial surge on use, the fridge each time the compressor starts; the heater with the glowplugs. Wiring to both of those devices should be thicker than the normal current on use would suggest. For the Fridge, 4mm2 minimum, but maybe 6mm if a distance from the supply. For the Heater, the original wiring loom might just be ok if you get rid of the excess cable (don't tuck it out the way, cut it off).
On the flip side, the MaxxAir fan is very efficient and you don't need a heavy cable at all. just use the same as the USB sockets are using.