
wildebus
Forum Member
When fitting a rigid panel across the span of a convex roof (i.e. the centre is higher than the sides), you have to have the ends raised up in order for the middle of the panel to clear the middle of the roof. This means the plastic corner mounts typically will not work as they don't raise the ends enough.
To get round this issue of a raised centre, I use "Z" Brackets. I have them on all the panels on my LT and find they work very well generally on Panel Van Conversions where the roof is convex
There are a few versions of these brackets branded in different ways. I have tended to buy 'Renogy' ones as they are typically the best priced ones, but I don't think there is a lot of difference in them (note, some brackets are called "Z Brackets" but are a different pattern - I am talking about a very specific shaped bracket here).
This is the Renogy Z Bracket I am discussing here:

Renogy Z Brackets by David, on Flickr
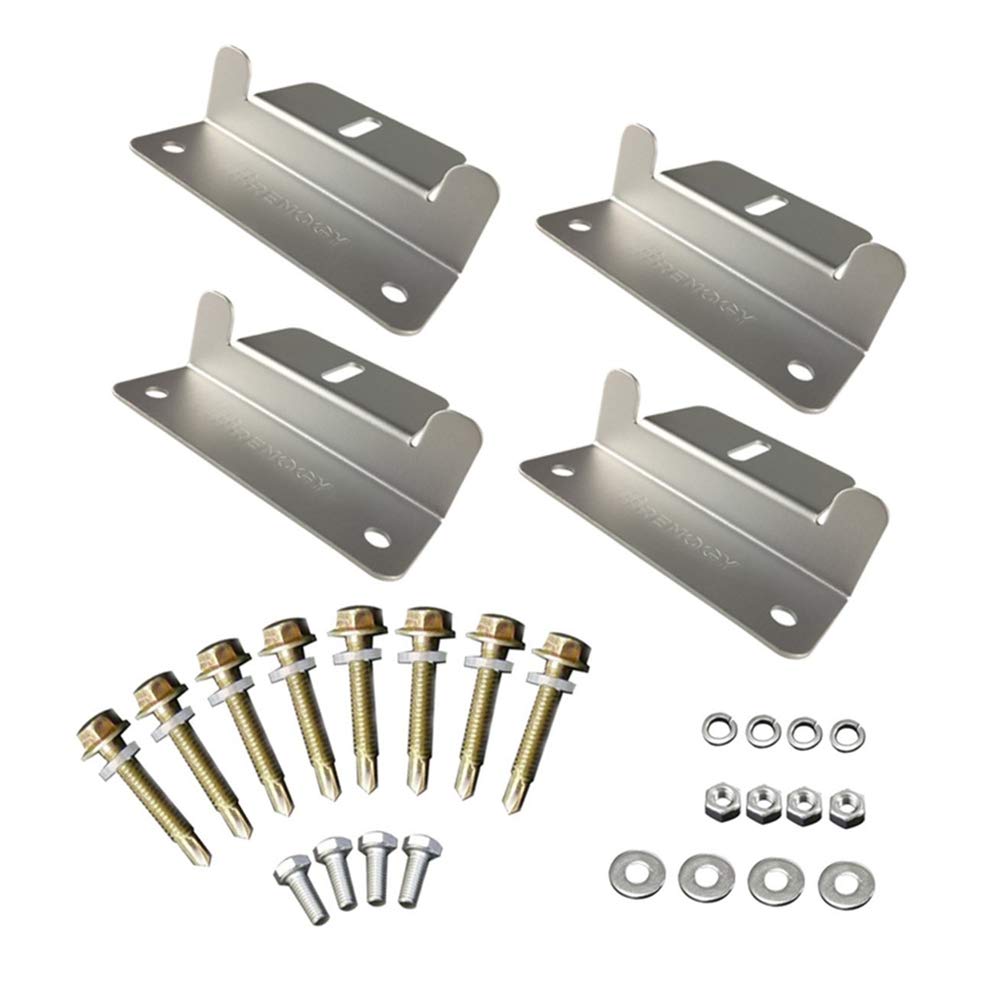
You get 4 brackets, 4 sets of bolts, washers, lock washers and nuts, and 8 self-trapping screws with plastic washers. Price varies between £7.50 and £12 depending on time and seller. I have always got mine from Amazon. The last ones I got were just a couple of days ago and were £8.20 (today they are £9.30 - the price of these fluctuates constantly)
This is what the bracket looks like and why I particularly like these

Renogy Z Brackets by David, on Flickr
The part which has "RENOGY" stamped on it goes onto the roof; The part that has the long slot cutout is raised and is where the solar panel rests on and the nut & bolt goes through the slot into the holes that are already present in all rigid panels; and finally the vertical part has two raised props that the panel side goes against for positioning.
This design allows for a very consistent fixing for all panels and the raised part is usually enough to allow the middle of the panel to just clear the middle of the roof..
The flat part that mounts onto the roof is a good size that allows the load to be spread and is large enough to use for tape or adhesive if you prefer not to use the provided self-taping screws (I always recommend physical fastenings but the choice is there).
However, the Z Bracket adds an extra dimension as well....
The size of that plate lends itself to flexibility as well. For my LT, I drill an M8 Bolt sized hole to allow captive bolts running in roof tracks to go through the bracket

Renogy Z Brackets by David, on Flickr
And then make extra holes in the frame of the solar panel to allow the bracket to be secure on the panel in a location suitable for the roor rail

Renogy Z Brackets by David, on Flickr
And the panel with the bracket mounted on the roof
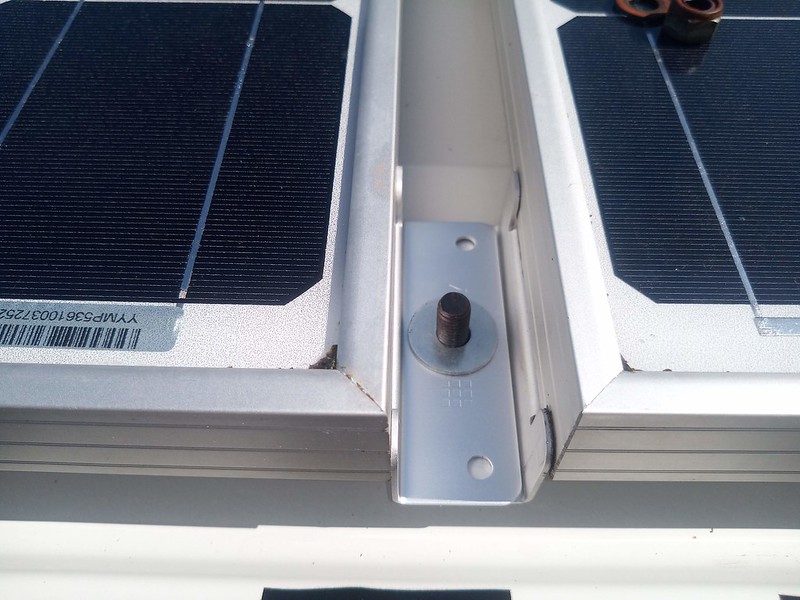
Renogy Z Brackets by David, on Flickr
The Bracker is sitting on the roof rail so well supported. The captive bolt goes through the bracket and will be then bolted down and be completely secure. In this case, because the foot plate part is totally flat, I can stack them so I have two panels, each with their own Z bracket, but sharing the single captive bolt.
Long post to discuss a simple bracket, but thought it might be worth talking about as this bracket is very versatile.
There are a few listings on Amazon and also other on-line stores for these brackets. This is a link to the ones I pictured about - https://amzn.to/2W1ns31 (currently £9.25 at the time I posted the link - will be higher or lower this time next week!)
And a good photo showing what you get (I actually got 8 ring washers, not 4, as it happens and I think that is correct)
To get round this issue of a raised centre, I use "Z" Brackets. I have them on all the panels on my LT and find they work very well generally on Panel Van Conversions where the roof is convex
There are a few versions of these brackets branded in different ways. I have tended to buy 'Renogy' ones as they are typically the best priced ones, but I don't think there is a lot of difference in them (note, some brackets are called "Z Brackets" but are a different pattern - I am talking about a very specific shaped bracket here).
This is the Renogy Z Bracket I am discussing here:
Renogy Z Brackets by David, on Flickr
You get 4 brackets, 4 sets of bolts, washers, lock washers and nuts, and 8 self-trapping screws with plastic washers. Price varies between £7.50 and £12 depending on time and seller. I have always got mine from Amazon. The last ones I got were just a couple of days ago and were £8.20 (today they are £9.30 - the price of these fluctuates constantly)
This is what the bracket looks like and why I particularly like these
Renogy Z Brackets by David, on Flickr
The part which has "RENOGY" stamped on it goes onto the roof; The part that has the long slot cutout is raised and is where the solar panel rests on and the nut & bolt goes through the slot into the holes that are already present in all rigid panels; and finally the vertical part has two raised props that the panel side goes against for positioning.
This design allows for a very consistent fixing for all panels and the raised part is usually enough to allow the middle of the panel to just clear the middle of the roof..
The flat part that mounts onto the roof is a good size that allows the load to be spread and is large enough to use for tape or adhesive if you prefer not to use the provided self-taping screws (I always recommend physical fastenings but the choice is there).
However, the Z Bracket adds an extra dimension as well....
The size of that plate lends itself to flexibility as well. For my LT, I drill an M8 Bolt sized hole to allow captive bolts running in roof tracks to go through the bracket
Renogy Z Brackets by David, on Flickr
And then make extra holes in the frame of the solar panel to allow the bracket to be secure on the panel in a location suitable for the roor rail
Renogy Z Brackets by David, on Flickr
And the panel with the bracket mounted on the roof
Renogy Z Brackets by David, on Flickr
The Bracker is sitting on the roof rail so well supported. The captive bolt goes through the bracket and will be then bolted down and be completely secure. In this case, because the foot plate part is totally flat, I can stack them so I have two panels, each with their own Z bracket, but sharing the single captive bolt.
Long post to discuss a simple bracket, but thought it might be worth talking about as this bracket is very versatile.
There are a few listings on Amazon and also other on-line stores for these brackets. This is a link to the ones I pictured about - https://amzn.to/2W1ns31 (currently £9.25 at the time I posted the link - will be higher or lower this time next week!)
And a good photo showing what you get (I actually got 8 ring washers, not 4, as it happens and I think that is correct)

 just been on "live chat" to the hosting company asking them to fix it pronto!