How to remove trim Sprinter T1n

Nabsim

Forum Member
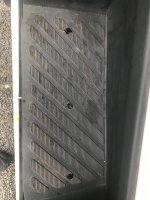
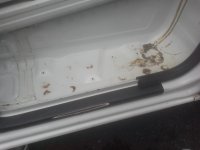
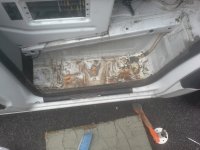
I am not sure what the proper term for it is but I want to remove the plastic trim that sits in the door well (?) on the passenger side. It’s the bit you put you foot in before getting up to cab floor level.

Driver side is easily removed by unscrewing the two very obvious Phillips head screws but there is nothing visible on the passenger side that holds it in place.

Does anyone know how to remove this without causing damage. Asking here as I know we have a few current and ex Sprinter and Crafter owners.
 

Nabsim

Forum Member
I think there might be two flush caps in the footwell likely covering screws?
Passenger side? I have that drivers side but can’t spot them on passenger side. I will have a good close look with my specs on tomorrow and report back 👍
 

wildebus

Forum Member
Passenger side? I have that drivers side but can’t spot them on passenger side. I will have a good close look with my specs on tomorrow and report back 👍
I'll have a check on this ... I am sure I did this on my T1N VW LT a few years back.

PS. I think it is called the "door step"?
 

wildebus

Forum Member
I had a look at the photos I took from when I started my conversion and it would look like I never had reason to take the step covers off? I thought I might have done to remove the floor covering but it would seem not. The following picture may be of some interest as it shows the cover without any flooring in place
IMG_20170710_124404.jpg


If it is like the typical step cover as used by VW in their T4 and T5 at least, then it is a push fit with clips.
This is my T4 with the step off -
IMG_3881.JPG

the top 3 rectangular white bits are where moulded clips on the step cover push in; the bottom 2 (should be one in the middle as well but rusted off) are clips that would be attached to the step and then push into little grommets in holes in the floor.
If you are able to crawl underneath the cab floor and get a torch on the floor you may be able to see little plastic protrusions which would be the clips.

You could also check out the Sprinter-source forum. Very likely to be some info in there within the T1N section.
 

Sprinter 1 cup

Forum Member
Its only thin metal. So as above , fill for the screws from under neath on outside. To find blanking caps. Evan the newer ones have problem's as no drainage at step.
I've also only done drivers side. I used wire brush attachments on drill to clean as its sort of corrugated for strength.
 

Attachments

  • 20211217_134545.jpg
    20211217_134545.jpg
    1,011.8 KB · Views: 159
  • 20211217_131448.jpg
    20211217_131448.jpg
    1.4 MB · Views: 150

Phantom

Forum Member
I have just looked at my T1n and there are three round covers on the tread plate, this is on both the driver's and passenger side. (y)
 

Phantom

Forum Member
I had a look at the photos I took from when I started my conversion and it would look like I never had reason to take the step covers off? I thought I might have done to remove the floor covering but it would seem not.
Same here when I removed the flooring to add some closed cell foam to the footwells.
 

Nabsim

Forum Member
Not been to look yet as we have still got rain but will check later. I haven’t laid on the floor so far due to the rain but had a feel yesterday and wasn’t sure. I should spot covers if it has them, with my glasses on i hope lol
 

Nabsim

Forum Member
@wildebus , I couldn’t find anything on sprinter-source but that may have been my search terms. Anything with step gave the side door step which seems popular for problems but not front door steps
 

wildebus

Forum Member
Did a search there myself now ..... There are some very worrying photos of what lurks beneath! looks like it is a real water/rust trap!
On my door step cill, I just needed a tiny repair of a little disc which my niece welded in for me. Sounds like the Sprinters need a drain added?
IMG_3878.JPG
 

Nabsim

Forum Member
I was about to take a pic to post showing there was nothing there when I spotted one in the middle. Bit more looking and I spotted the other two. The bungs that went in were a perfect match and very hard to see even with my glasses on. Took bungs out and then took a pic in case anyone needs to know where they are in future.

Thanks folks, I would never have spotted them without your input
 

Attachments

  • FED23C4E-2B55-4DAA-A3E6-15BD8386357E.jpeg
    FED23C4E-2B55-4DAA-A3E6-15BD8386357E.jpeg
    1.8 MB · Views: 160

Nabsim

Forum Member
I would be interested to know what condition the metal underneath is in as I expect mine may be similar?
I couldn’t find the right size star driver yesterday so son in law bringing his over this morning. I know drivers side is very good apart from dust and dirt that had got behind it but it wiped off okay, hopefully this side will be similar but I will report back 👍
 

Nabsim

Forum Member
Had the trim out to run the cable I wanted and it is almost like new underneath it. There is a drain towards the right end in the centre of the step.

Hopefully yours will be in the same condition Phantom 👍
 

Phantom

Forum Member
Had the trim out to run the cable I wanted and it is almost like new underneath it. There is a drain towards the right end in the centre of the step.

Hopefully yours will be in the same condition Phantom 👍
That's good so I don't need to check mine! 😉 (y)
 

Users who viewed this discussion (Total:0)

Top