
Dinosawus
Forum Member
Long post explaining the build with photos below.

After toying with the idea of doing a LoLoader conversion I settled on a standard panel van conversion on a modern base vehicle for ease of ownership and reliability and I need a Euro 6 for the low emissions zone.
My aim was to build a versatile weekend adventure van that can be used as a camper as well as a toy hauler or work van when needed so the fold away murphy bed and full length floor space is key to this design. I also wanted removable seats in the rear for flexibility when the kids do want to join me and more space for my motorbike when they don't.
It took a long, long time to find a suitable base van that was Euro 6, L3H3, automatic, air con, cruise control and sub £20k almost impossible to find this combination so I settled for everything except the cruise control and got an ex delivery panel van in pretty clean condition with 63k miles. A manual would have been a lot cheaper but I like cruisin in comfort.
The van had damage to the steering from being run up the kerbs during deliveries so needed the drive shafts replaced but wasnt that expensive. Cruise control is very important to me on long trips with the fatigue of holding the accelerator for 4 hours and had read that it was possible to retrofit this to the Mk7 transit and possibly the mk8 so took a risk that I could get this working. After a lot of research on the web, buying three different steering wheels with controls and some trial and error with a friendly auto modifier and his computer we got the cruise control working. All of the settings are there in the menu they just need to be switched on in the backend in the right order and everything comes to life like as expected. See my separate post on this topic.
With the steering and cruise sorted l I set to on the conversion. I used the Mispronounced Adventures YouTube channel for Mk8 conversion ideas (thank you) and Greg Virgoe for electrics etc (thank you). My inspiration was the many 4x4 custom adventure van builders in the US where there is a lot of demand for this type of vehicle and they sell for upwards of $100k for a standard one albeit with very high quality finish.
I have decent enough DIY and cabinetry skills but found the campervan build hard work with a lot of metal work required, drilling into metal framing with tiny drill bits to secure a fix and a lot of broken drills. I kept the number of external holes to a minimum by keeping the fresh water tank inboard and the filler internal, accessed via the kitchen end panel with the rear doors open.
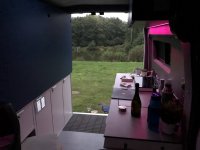
The design layout is simple with separation of water and electric into opposite sides, water tanks and kitchen on one side and all the electrics and bed above on the other side with electrical cables fed back across to the kitchen side up and over through the chassis cavity. I chose not to make an enclosed shower/toilet as its not justified for a weekend van and takes up too much space. I built a stand alone separating loo box with a space under the murphy bed to store it and just pull it out when needed which isnt often. There is a hot/cold shower mixer in the rear of the kitchen pod and will rig up a shower curtain between the rear doors for an outdoor shower.
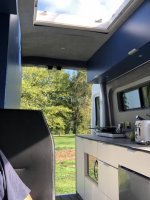
After stripping out the interior paneling (kept for templating) and bulkhead (fell on my head and hurt) I did the windows. I bought a sheet metal cutter to make the holes which was a bit daunting, purchased the Transit Mk8 campervan windows from vanpimps and installed. I prefer the flush glass windows over the protruding plastic motorhome windows for a tidy look and security. I put in a lot of windows all around to give a more connected feeling to the outside but went with a 90% tint for privacy which works very well. I added a large Heki 2 sunroof in the center of the roof for light and air when cooking, leaving enough space for large solar panels on either side.
I made the framing for the cabinets out of 34mm square planed timber and 9mm plywood panel in most places to keep the weight down. The cupboard/drawer doors are 18mm MDF to give enough purchase for screws and hinges etc. The 80L fresh water tank sits in front of the wheel arch and the 40L waste water tank is slung underneath the van. I made the draws and cupboards myself as I thought it would be easier to fit the contours of the van but I would use off the shelf kitchen cabinets next time and cut them down to size to get a straighter, flush finish at the front as custom drawers are not easy to align and make to slide well. The kitchen worktop is solid laminate which is seriously strong and durable but a bit heavy. I'm happy with the overhead cabinets, two over the kitchen with doors to take food and storage and the other side is open for stuffing bags and clothes into and they don't often fall out. I would recommend a nail gun and glue approach to constructing the cabinets over the pocket screw approach depending on load. Its much easier and faster to build and once its all secured to the metal framing with screws it will be strong enough.
For insulation I used a combination of rockwool in the cavities, PIR foam board on the flat wall surfaces, insulated underlay as a moisture barrier, foam backed foil and tape, then covered directly by fabric with spray adhesive onto the foil or plywood panels covered with fabric and fixed with screws to the metal frame.
The swivel seats were another big job requiring the handbrake cradle to be cut and lowered, followed instructions on https://faroutride.com/swivel-transit/. I used a RIB swivel on the drivers side from Kiravans and a FASP swivel base from camperinteriors.co.uk on the passenger side. I bought a single passenger seat and base from the wreckers which was expensive. Sourcing all of the materials was time consuming and difficult in some cases except the 12V electrics which I mostly got from https://www.12voltplanet.co.uk/. Its a real challenge to keep the costs down though.
The murphy bed is connected to the electric pod via a 20x20 aluminium profile frame and hinges which took some thinking to get the dimensions and strength right. Would recommend 40x40 profile. I used torsion struts from Metrol Springs to make the bed frame easier to lift and drop down with some resistance to avoid slamming. The bed latches into the overhead cabinet on one side with a shoot bolt into the metal chassis on the other and drops down onto the kitchen cabinet for support. The bed has a low profile when raised to open up the interior space for gear while still being made up and ready to drop down easily for sleeping.
To keep costs down I purchased many of the electrics used off Ebay which is a risk that they might have problems but I got lucky. I chose Sterling Power products everywhere I could and their technical support and documentation is excellent. I bought 2 x 100Ah Lithium batteries new from Sterling, a used Pro Combi S 2500w invertor charger (out of an ice cream van), B2B charger, 30 A MPPT charger and solar panels, all running through a shunt from Renogy to monitor power consumption. I use the BMS from the batteries on my mobile phone to monitor battery levels.
I did not want to install gas and don't need it. Everything is run from 240V on the inverter, induction hob, 2Kw kettle, 1Kw toaster, 900W combination microwave, even the fridge is 240V which Sterling have proved is almost as efficient as a 12V fridge but 1/5th the price. I need to be careful not to exceed the limit of the inverter by running only 1 or 2 devices at the same time.
I recently installed a SVANs 10L 12V hot water heater which is powered by the excess load on the MPPT solar changer after the batteries are recharged giving another energy storage option and free hot water, if the sun shines. I do have shore power through the Combi but I never use it and dont even carry the lead as the solar and B2B take care of all my needs. I use a Planar 2Kw diesel heater, which I would recommend over the Chinese clones, to take the chill off in the mornings and have an electrowarmth.com 12V electric blanket under the topper mattress to beat the cold at night, highly recommended.
Energy consumption with a normal day of cooking two meals, fridge, hot drinks and lights etc uses about 25-40% of the 200Ah battery bank. I have never depleted below 50%. The 500W solar will recharge this to 100% in around 3-4 hours in normal sunshine and the B2B takes about the same. I might add a 2nd B2B and have space for additional batteries but its unlikely I will need them. This setup works fine for a weekend van when you are not staying in one place for long but might not suit a longer term stay with limited sunshine or heavy hot water usage etc.
The finished weight of the van empty but with water and fuel tanks full is around 2850kg which leaves plenty for people and gear and a 200kg motorcycle. I used the weighbridge at my local recycling center to check my weight during the build") . I have an extendable ramp to get the bike on and off and kept most of the original tie down points to secure it using straps which works great, I can do the long miles in the van to a scenic place, do the twisties on the bike and stay a night or two then cruise back in the comfort of the van. No more arsenumbing, brainnumbing motorway rides.
. I have an extendable ramp to get the bike on and off and kept most of the original tie down points to secure it using straps which works great, I can do the long miles in the van to a scenic place, do the twisties on the bike and stay a night or two then cruise back in the comfort of the van. No more arsenumbing, brainnumbing motorway rides.
The photos below are from the completed campervan back through to the base vehicle with a few build shots to give an idea of the work involved and my approach. I tried to keep it simple and keep the weight and costs down. I've done nearly 6k miles and everything is running as it should.
If your interested to know more on this build or want any references for equipment used let me know.


.jpg")
After toying with the idea of doing a LoLoader conversion I settled on a standard panel van conversion on a modern base vehicle for ease of ownership and reliability and I need a Euro 6 for the low emissions zone.
My aim was to build a versatile weekend adventure van that can be used as a camper as well as a toy hauler or work van when needed so the fold away murphy bed and full length floor space is key to this design. I also wanted removable seats in the rear for flexibility when the kids do want to join me and more space for my motorbike when they don't.
It took a long, long time to find a suitable base van that was Euro 6, L3H3, automatic, air con, cruise control and sub £20k almost impossible to find this combination so I settled for everything except the cruise control and got an ex delivery panel van in pretty clean condition with 63k miles. A manual would have been a lot cheaper but I like cruisin in comfort.
The van had damage to the steering from being run up the kerbs during deliveries so needed the drive shafts replaced but wasnt that expensive. Cruise control is very important to me on long trips with the fatigue of holding the accelerator for 4 hours and had read that it was possible to retrofit this to the Mk7 transit and possibly the mk8 so took a risk that I could get this working. After a lot of research on the web, buying three different steering wheels with controls and some trial and error with a friendly auto modifier and his computer we got the cruise control working. All of the settings are there in the menu they just need to be switched on in the backend in the right order and everything comes to life like as expected. See my separate post on this topic.
With the steering and cruise sorted l I set to on the conversion. I used the Mispronounced Adventures YouTube channel for Mk8 conversion ideas (thank you) and Greg Virgoe for electrics etc (thank you). My inspiration was the many 4x4 custom adventure van builders in the US where there is a lot of demand for this type of vehicle and they sell for upwards of $100k for a standard one albeit with very high quality finish.
I have decent enough DIY and cabinetry skills but found the campervan build hard work with a lot of metal work required, drilling into metal framing with tiny drill bits to secure a fix and a lot of broken drills. I kept the number of external holes to a minimum by keeping the fresh water tank inboard and the filler internal, accessed via the kitchen end panel with the rear doors open.
The design layout is simple with separation of water and electric into opposite sides, water tanks and kitchen on one side and all the electrics and bed above on the other side with electrical cables fed back across to the kitchen side up and over through the chassis cavity. I chose not to make an enclosed shower/toilet as its not justified for a weekend van and takes up too much space. I built a stand alone separating loo box with a space under the murphy bed to store it and just pull it out when needed which isnt often. There is a hot/cold shower mixer in the rear of the kitchen pod and will rig up a shower curtain between the rear doors for an outdoor shower.
After stripping out the interior paneling (kept for templating) and bulkhead (fell on my head and hurt) I did the windows. I bought a sheet metal cutter to make the holes which was a bit daunting, purchased the Transit Mk8 campervan windows from vanpimps and installed. I prefer the flush glass windows over the protruding plastic motorhome windows for a tidy look and security. I put in a lot of windows all around to give a more connected feeling to the outside but went with a 90% tint for privacy which works very well. I added a large Heki 2 sunroof in the center of the roof for light and air when cooking, leaving enough space for large solar panels on either side.
I made the framing for the cabinets out of 34mm square planed timber and 9mm plywood panel in most places to keep the weight down. The cupboard/drawer doors are 18mm MDF to give enough purchase for screws and hinges etc. The 80L fresh water tank sits in front of the wheel arch and the 40L waste water tank is slung underneath the van. I made the draws and cupboards myself as I thought it would be easier to fit the contours of the van but I would use off the shelf kitchen cabinets next time and cut them down to size to get a straighter, flush finish at the front as custom drawers are not easy to align and make to slide well. The kitchen worktop is solid laminate which is seriously strong and durable but a bit heavy. I'm happy with the overhead cabinets, two over the kitchen with doors to take food and storage and the other side is open for stuffing bags and clothes into and they don't often fall out. I would recommend a nail gun and glue approach to constructing the cabinets over the pocket screw approach depending on load. Its much easier and faster to build and once its all secured to the metal framing with screws it will be strong enough.
For insulation I used a combination of rockwool in the cavities, PIR foam board on the flat wall surfaces, insulated underlay as a moisture barrier, foam backed foil and tape, then covered directly by fabric with spray adhesive onto the foil or plywood panels covered with fabric and fixed with screws to the metal frame.
The swivel seats were another big job requiring the handbrake cradle to be cut and lowered, followed instructions on https://faroutride.com/swivel-transit/. I used a RIB swivel on the drivers side from Kiravans and a FASP swivel base from camperinteriors.co.uk on the passenger side. I bought a single passenger seat and base from the wreckers which was expensive. Sourcing all of the materials was time consuming and difficult in some cases except the 12V electrics which I mostly got from https://www.12voltplanet.co.uk/. Its a real challenge to keep the costs down though.
The murphy bed is connected to the electric pod via a 20x20 aluminium profile frame and hinges which took some thinking to get the dimensions and strength right. Would recommend 40x40 profile. I used torsion struts from Metrol Springs to make the bed frame easier to lift and drop down with some resistance to avoid slamming. The bed latches into the overhead cabinet on one side with a shoot bolt into the metal chassis on the other and drops down onto the kitchen cabinet for support. The bed has a low profile when raised to open up the interior space for gear while still being made up and ready to drop down easily for sleeping.
To keep costs down I purchased many of the electrics used off Ebay which is a risk that they might have problems but I got lucky. I chose Sterling Power products everywhere I could and their technical support and documentation is excellent. I bought 2 x 100Ah Lithium batteries new from Sterling, a used Pro Combi S 2500w invertor charger (out of an ice cream van), B2B charger, 30 A MPPT charger and solar panels, all running through a shunt from Renogy to monitor power consumption. I use the BMS from the batteries on my mobile phone to monitor battery levels.
I did not want to install gas and don't need it. Everything is run from 240V on the inverter, induction hob, 2Kw kettle, 1Kw toaster, 900W combination microwave, even the fridge is 240V which Sterling have proved is almost as efficient as a 12V fridge but 1/5th the price. I need to be careful not to exceed the limit of the inverter by running only 1 or 2 devices at the same time.
I recently installed a SVANs 10L 12V hot water heater which is powered by the excess load on the MPPT solar changer after the batteries are recharged giving another energy storage option and free hot water, if the sun shines. I do have shore power through the Combi but I never use it and dont even carry the lead as the solar and B2B take care of all my needs. I use a Planar 2Kw diesel heater, which I would recommend over the Chinese clones, to take the chill off in the mornings and have an electrowarmth.com 12V electric blanket under the topper mattress to beat the cold at night, highly recommended.
Energy consumption with a normal day of cooking two meals, fridge, hot drinks and lights etc uses about 25-40% of the 200Ah battery bank. I have never depleted below 50%. The 500W solar will recharge this to 100% in around 3-4 hours in normal sunshine and the B2B takes about the same. I might add a 2nd B2B and have space for additional batteries but its unlikely I will need them. This setup works fine for a weekend van when you are not staying in one place for long but might not suit a longer term stay with limited sunshine or heavy hot water usage etc.
The finished weight of the van empty but with water and fuel tanks full is around 2850kg which leaves plenty for people and gear and a 200kg motorcycle. I used the weighbridge at my local recycling center to check my weight during the build
. I have an extendable ramp to get the bike on and off and kept most of the original tie down points to secure it using straps which works great, I can do the long miles in the van to a scenic place, do the twisties on the bike and stay a night or two then cruise back in the comfort of the van. No more arsenumbing, brainnumbing motorway rides.The photos below are from the completed campervan back through to the base vehicle with a few build shots to give an idea of the work involved and my approach. I tried to keep it simple and keep the weight and costs down. I've done nearly 6k miles and everything is running as it should.
If your interested to know more on this build or want any references for equipment used let me know.
Attachments
Last edited: