Have I missed anything?!?!?! Will this end in flames?!??!?!

JD01

Forum Member
Hi folks,

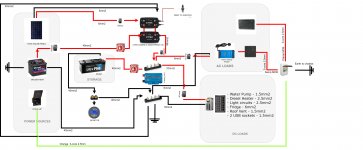
Hoping to get some eyes over my wiring diagram for my transit minibus conversion. It's a 2015 Transit and i'm about to start running some cables. Electrics are new to me and i've spent a fair while trying to learn over the past few months. I would really appreciate it if someone with more knowledge than me could take a quick look at the diagram.

The plan is to have a 220ah AGM battery under the passenger seat (the starter batteries are under the drivers seat) with the plan to run cables to the rear wheel arch where the electrical cupboard will be.

Any advice would be much appreciated!
Main Electric Diagram.jpg
 

wildebus

Forum Member
Nice Diagram :)

Questions and a comment

Q. Any Reason why you are running an earth cable from the Van/Starter Battery to a -ve Bus Bar? tapping into the chassis for a connection will be fine unless the rear of the vehicle where the Leisure Electrics are are isolated from the cab in terms of chassis metal. You can run the cable but I don't think there is any real advantage or point in doing so.

Q. You have 40mm2 cable from Starter to the CTEK B2B, and then 40mm2 cable from B2B to Leisure on the +ve side. Nice chunky cable for sure (not sure if you really need cable that chunky and can be a right pain to route). But then you have just 10mm cable to the B2B on the -ve side. I have not fitted a CTEK B2B or checked the install guide but generally you would match the gauges for +ve and -ve on a B2B setup (and any setups really - the +ve and -ve together are the flow. a skinny return negates the advantage of a heavy supply)

C. You have a CTEK 7A mains charger. I would say that is way too small a charger for a 220A Leisure Battery. I don't know how you will be using your camper once done, but take an example of being in a campsite with hookup so you plug in ....
You use the TV, you turn on the lights, maybe you have a compressor fridge? All those things will run off the battery - and the 7A charger needs to make up all THAT use before it can even start its 'real' job of charging the battery. You need a 30A charger at a minumum I would say.
By having an undersized charger you will take an age to really charge the battery, PLUS - and this will be a real pain and cause confusion - it is likely the BMV Battery Monitor (a wise choice) will think the battery is full well before it is because of the alogorithm it uses is partially based on how small a current is going into the battery.
If it sees under 4% for 3 minutes at a certain voltage - bang! 100% full. Your 7A charger can't even reach 4% (8A on a 200Ah battery) at full power.
You need a better charger!
 

SquirrellCook

Forum Member
I've seen coaches that run independent earth/return cables to devices at the rear. I wonder if it's due to galvanic corrosion?
 

wildebus

Forum Member
I've seen coaches that run independent earth/return cables to devices at the rear. I wonder if it's due to galvanic corrosion?
maybe the rear chassis is not very well connected to the front in terms of conductivity?

Or the build is too isolated from the chassis and easier to run a cable inside to the back? I added a -ve cable running from the habitation box to the cab area in my motorhome for that reason.
 

JD01

Forum Member
Hi there,

Thanks so much for your feedback, it really is appreciated!!

Q. Any Reason why you are running an earth cable from the Van/Starter Battery to a -ve Bus Bar? tapping into the chassis for a connection will be fine unless the rear of the vehicle where the Leisure Electrics are are isolated from the cab in terms of chassis metal. You can run the cable but I don't think there is any real advantage or point in doing so.

According to some sample diagrams on the CTEK manual they run a cable to both negative terminals (https://cdn.tayna.com/datasheets/D250SE-SMARTPASS120S.pdf)

Q. You have 40mm2 cable from Starter to the CTEK B2B, and then 40mm2 cable from B2B to Leisure on the +ve side. Nice chunky cable for sure (not sure if you really need cable that chunky and can be a right pain to route). But then you have just 10mm cable to the B2B on the -ve side. I have not fitted a CTEK B2B or checked the install guide but generally you would match the gauges for +ve and -ve on a B2B setup (and any setups really - the +ve and -ve together are the flow. a skinny return negates the advantage of a heavy supply)

Again, from what I take from the manual this looks like their recommendation (see attached image)

C. You have a CTEK 7A mains charger. I would say that is way too small a charger for a 220A Leisure Battery. I don't know how you will be using your camper once done, but take an example of being in a campsite with hookup so you plug in ....
You use the TV, you turn on the lights, maybe you have a compressor fridge? All those things will run off the battery - and the 7A charger needs to make up all THAT use before it can even start its 'real' job of charging the battery. You need a 30A charger at a minumum I would say.
By having an undersized charger you will take an age to really charge the battery, PLUS - and this will be a real pain and cause confusion - it is likely the BMV Battery Monitor (a wise choice) will think the battery is full well before it is because of the alogorithm it uses is partially based on how small a current is going into the battery.
If it sees under 4% for 3 minutes at a certain voltage - bang! 100% full. Your 7A charger can't even reach 4% (8A on a 200Ah battery) at full power.
You need a better charger!

I did wonder about this charger! Great, a 30amp charger it is!!!

With electrics being very new to me one thing i've been searching for but have failed to find an answer is about using bus bars especially with different sized cable gauges. For example could I run the 40mm positive cable out of the CTEK into the positive busbar whilst at the same time having a 10mm wire going to the 12v fuse box - what I don't understand is what stops the max current of 120 amps coming out the CTEK and flowing into the 10mm cable which isn't rated for such loads? Hopefully that makes sense??!?!?!

Any clarity on that would be super appreciated!
ctekcable.PNG
 

wildebus

Forum Member
the current drawn is down to the load. your diagram shows the right kind of sizes for the cable EXCEPT the 10mm -ve to the Smartpass - that must match the +ve.

Running the CTEK +ve to the Busbar would be fine, and would match the -ve busbar which could be nice in a symmetrical way. It also means the Isolation switch would full isolate the battery as well which would be better.

I see you are showing breakers rather than fuses - again it is an option but you don't really need to disconnect things once they are setup - standard fuseblocks might be a better option (good breakers whose actual performance match the rating are not cheap).


there is nothing wrong with running -ve cable to the starter, it just isn't usually a requirement (depends on the vehicle but I usually use a substantial chassis point, such as a seat base mount - these tend to be M10 or M12 and provide a very solid ground). the CTEK manual might go for a cable connection setup as it will be sure to work on any installation regardless, but can still adapt to your own setup.
 

JD01

Forum Member
Many thanks for this! I've made a few changes to the diagram and now plan to use the Victron Lynx power in bus bar

I've ran the Smartpass +ve to the bus bar, would I need another 300amp fuse here before the isolator?
 

Attachments

  • Main Electric Diagram V2.jpg
    Main Electric Diagram V2.jpg
    677.6 KB · Views: 572

wildebus

Forum Member
Many thanks for this! I've made a few changes to the diagram and now plan to use the Victron Lynx power in bus bar

I've ran the Smartpass +ve to the bus bar, would I need another 300amp fuse here before the isolator?
You could do, but what I would do with the Setup you have there is do the following if using the Lynx:
Lose all the Breakers (except maybe the PC Panel to CTEK one) and then configure as follows -
Lynx has a 4 way busbar, plus external posts either side
Busbar +ve:
#1 - CTEK B2B/MPPT
#2 - Victron 30A Mains Charger
#3 - 12V Distribution Output Cable
That leaves one spare ...
#4 - Leisure Battery
This will give you fuse protection dedicated to the battery, and then have an isolator between Lynx and Battery.

Busbar -ve@
For #1 to #4, match with the above on both position and cable gauge
You still need a -ve connection from the Starter Battery (either via chassis or direct cable, whichever you prefer) - that you would connect to one of the external posts, clamped down with an M8 Nut and Bolt.

As you mentioned the Lynx, I will post a link here to a very well priced example ;)
I am selling a Lynx Distributor (the one with the LED indicators for Blown Fuses etc) for around the same price as the Power in (which you would need to buy a bunch of nuts & bolts for as well to use as a fused busbar)
 

Begi

Forum Member
Hello.

First of all, I would like to thank you for sharing this information, which has helped me a lot in making some decisions.

I will be very grateful if you don't leave some of my questions unanswered.

1) I did not understand what critical and non-critical сonsumptions mean.

2) What exactly is the smartpass lamp out + for?

3) Where do you recommend connecting the inverter to the system similar to the one shown in the picture?

4) What should be the thickness of the earthing cable on a similar system?
 

Users who viewed this discussion (Total:0)

Top