'Chinese' Diesel Heater

wildebus

Forum Member
Heater

In my last conversion I installed an Eberspacher D2 Airtronic Diesel Heater and it was great :) but so it should have been as it cost over £600 (that is just the heater and parts, no installation costs as did this myself).
For my VW LT Conversion, I wanted another Diesel Heater but with the cost of an Eber' D2 - which had risen to over £750 now for the kit only! - I couldn't afford that so decided to risk the cheapo chinese Eberspacher clones at around £150. So a substantial saving on the cards there :).

Part 1: Introduction and Internal Installation

The plan was to install under the drivers seat, same as I did on the VW T5 with the Eberspacher. I checked Youtube for any tips on installing on a VW LT (aka Sprinter T1N) as can always find a handy timesaver on 'the tubes' but not in this case :(
Lots of "installing an Espar D2 on my Sprinter" videos but all for the later Sprinters (the 2nd Gen NCV3 model) and while the seat base looks very similar, the under-chassis under the seat was totally different. So on my own here (but as I tend to be old blue eyes ('I do it my way') anyway, suited me ;)


So this is the space the Heater will be located in
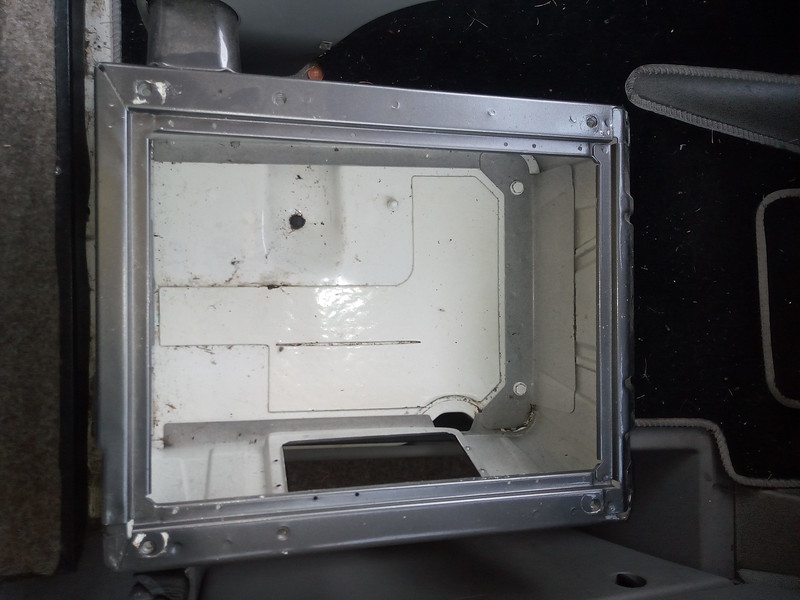
Empty Seat Base
by David, on Flickr
The electrics (fuses, relays, etc) are usually located under this seat but I had moved them to the other seat base a while back in readiness for fitting a heater here in the future.

This is under the vehicle from around centre line towards outer side
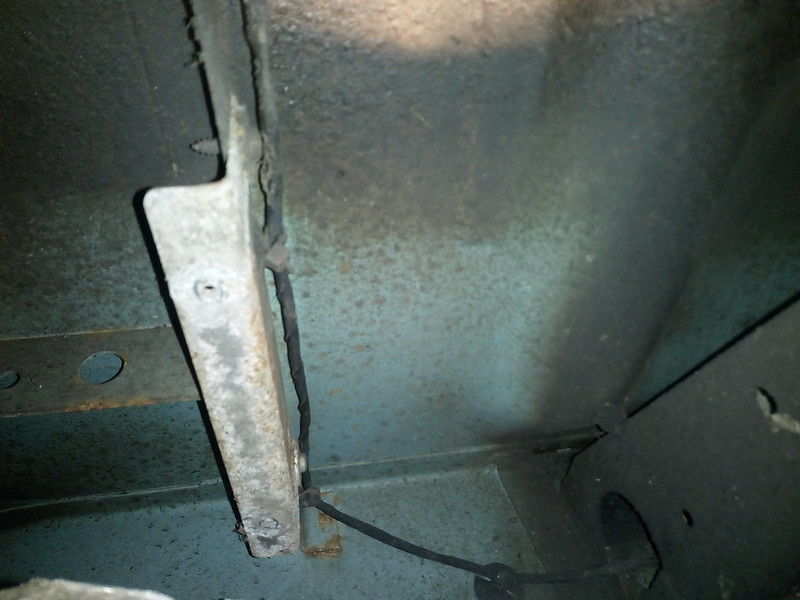
Underchassis under Seat by David, on Flickr
Looks fairly roomy but in fact not the case. The Bar with the cable clipped to it goes left to right and is around the upper third of the floor under the base. And the part at the end (where the cable curls round to carry on to) is actually a massive front to rear chassis support that is right in the middle of the seat base, so a major area inside the base is no use for the heater mounting.

Transferring the dimensions of obstructions from below to the base area, the options are very limited and this is what I decided on (rubber gasket shows the heater inlet/exhaust pipe positioning)
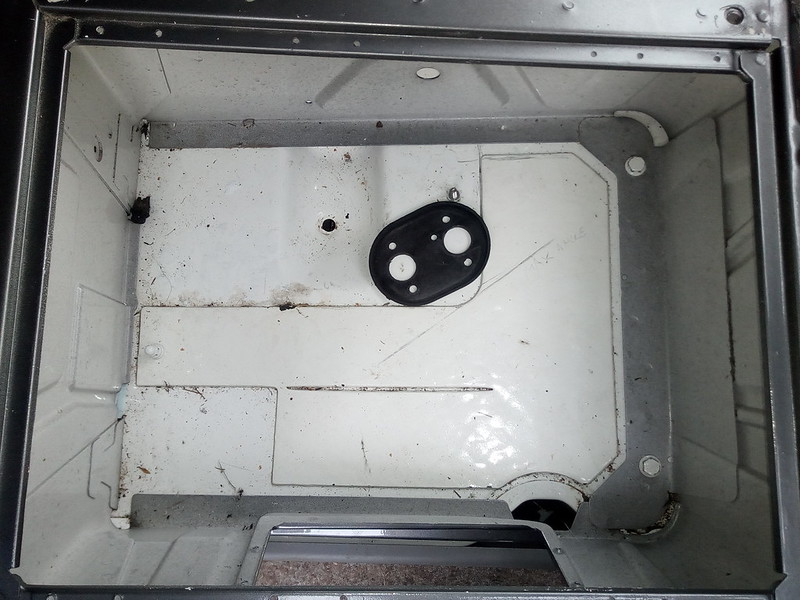
Best Location for Heater
by David, on Flickr
Essentially the white sheet just below the rubber gasket and to the right of the gasket are no-go areas for fitting. And to the left of the gasket there is a drop for cable routing which would make sealing a hole very tricky.

A couple of holes drilled out
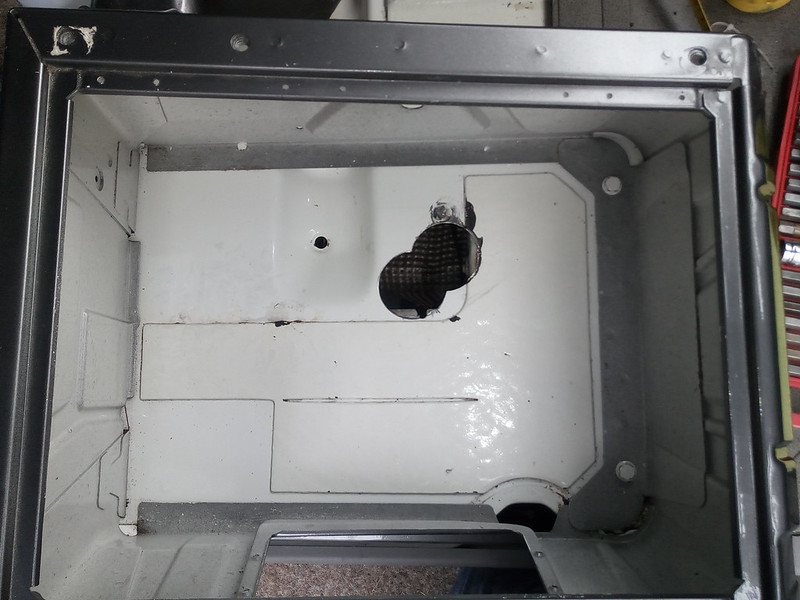
Holes Drilled
by David, on Flickr

A little close to the chassis beam but workable
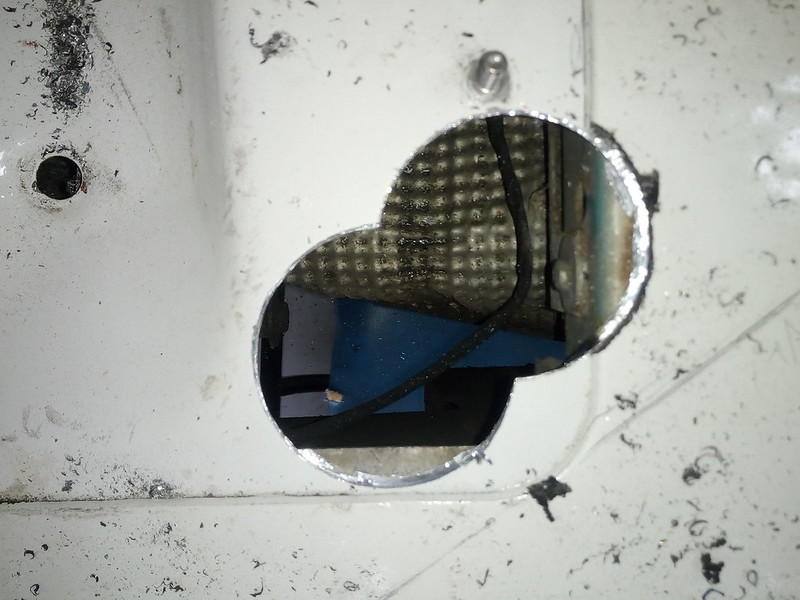
Close!
by David, on Flickr
You can see the exhaust shield below. This was dropped and moved out the way at the start (the photo showing the space underneath was actually taken with the camera in between the shield and the floor as the exhaust runs directly under where the heater is going!)


The Heater comes with a mounting plate
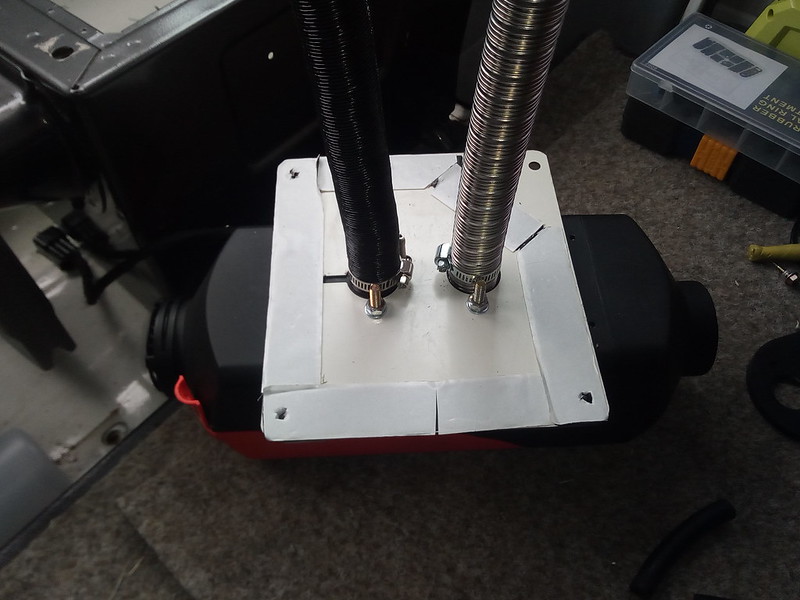
Mounting Plate with Butel Tape
by David, on Flickr
I specifically chose a kit with a plate (not all kits have them) as I think it is much better to make all the connections and secure them and then drop the lot in place as a oner rather then try and secure individual bits from underneath.
I added the tape as a sealing method. Much cleaner then using something like sikaflex in this situation.

And dropped into position
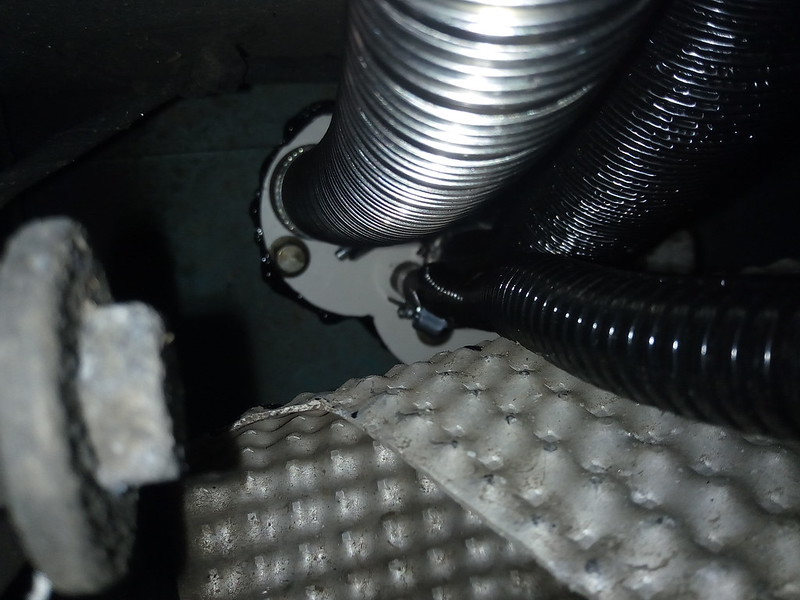
Underchassis view
by David, on Flickr
(The black around the hole cutout is a heavy dosage of Hammerite to protect the cut metal)

Drilled out another hole for the heater outlet at the back of the seat base
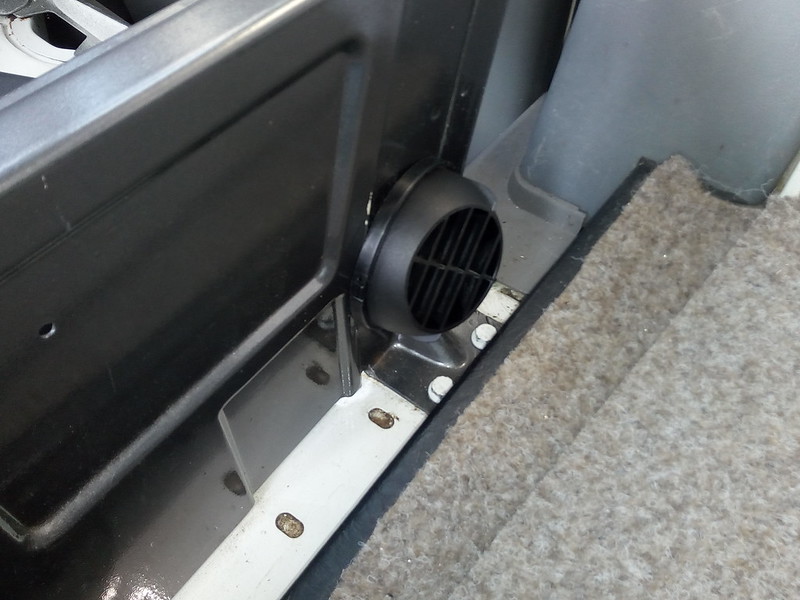
Heater Outlet at back of Seat Base
by David, on Flickr

And a birds-eye view of the heater all installed
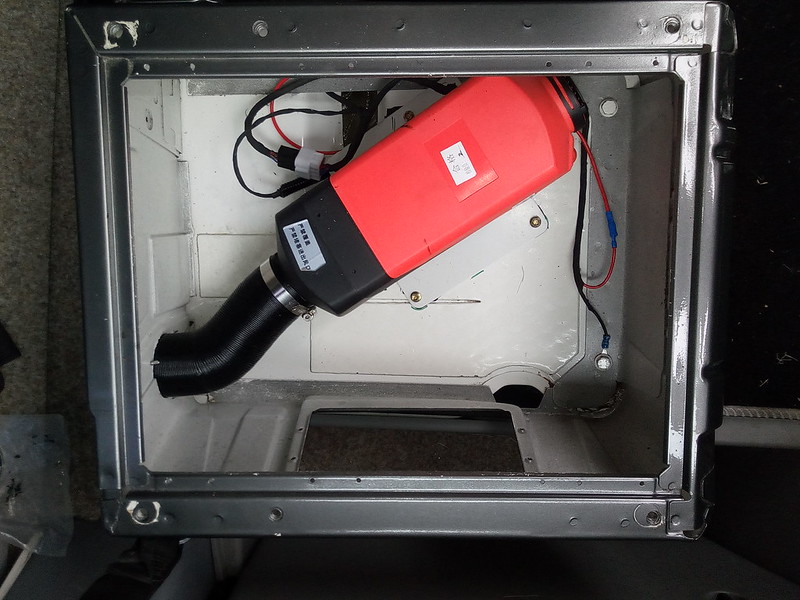
Heater setup and wired up
by David, on Flickr
I had previously run a 2.5mm cable in readiness for a heater so just routed this to the base and used a base bolt as the ground. (these heaters have a bit of a reputation for undersized cables leading to high voltage drops, so by chopping off most of the supplied power cable it will help eliminate that)

And the seat base cover refitted
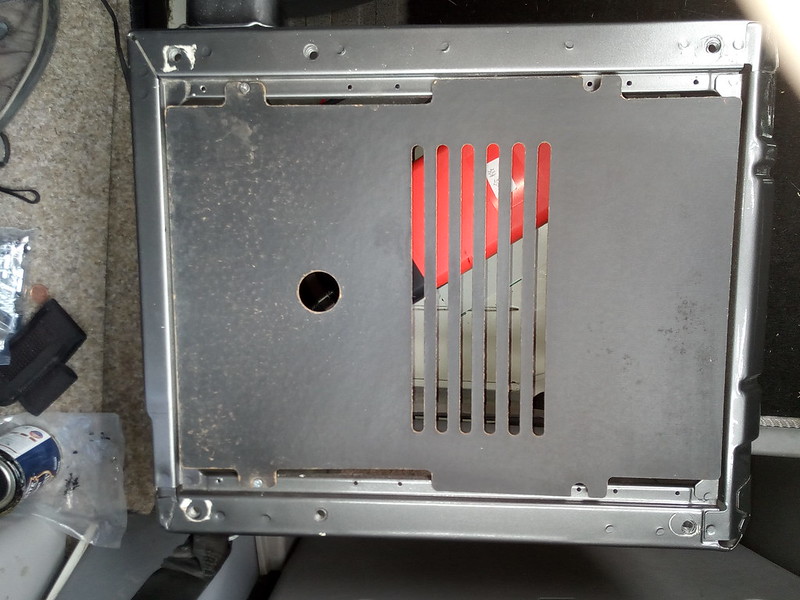
VW Hardboard Seatbase Cover
by David, on Flickr

I only have one of these (need one per seat really to protect the electrics under the other seat) and it has gone pretty droopy, so I made up a replacement in plywood
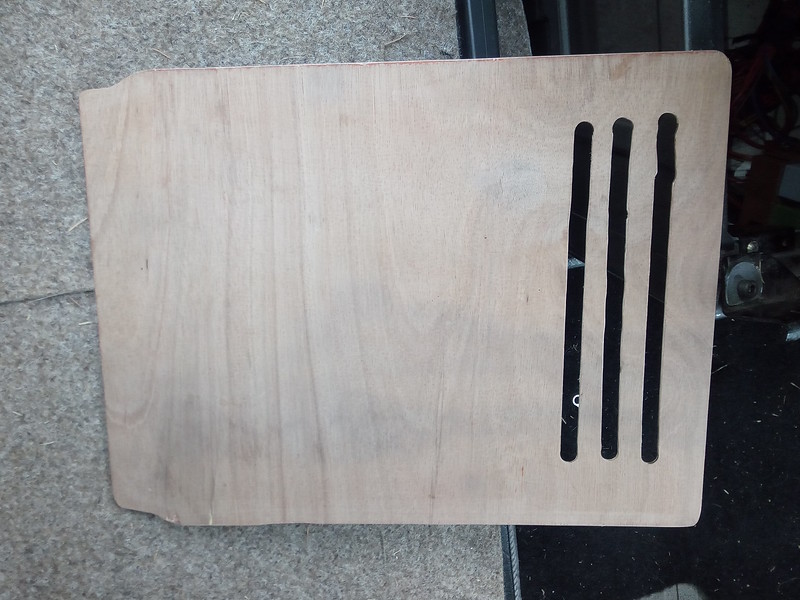
Replacement Ply Seat Base Cover
by David, on Flickr
I routed out some ventilation slots (unfortuatly the guide slipped on the first slot :( ), positioned in a place that would work better for the heater inlet and then sprayed black to blend in like the original
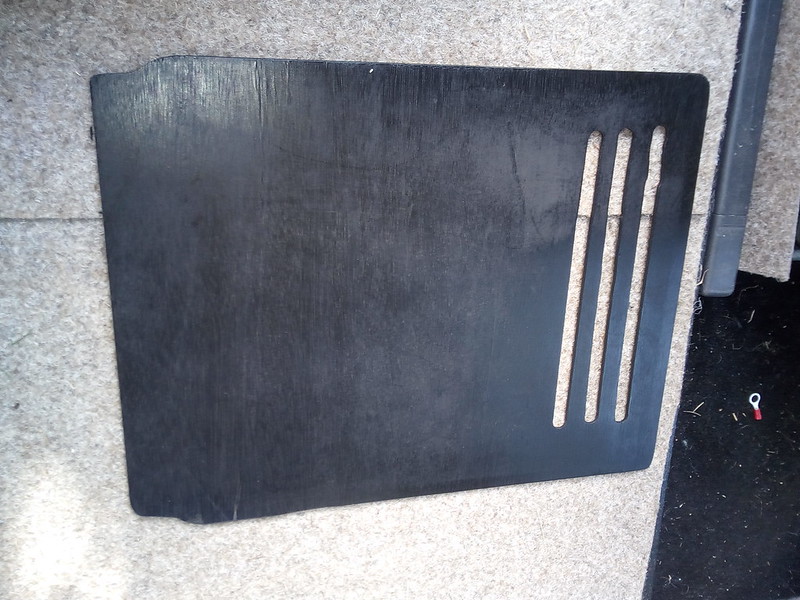
Ply Seat Base Cover Painted
by David, on Flickr

And put in place
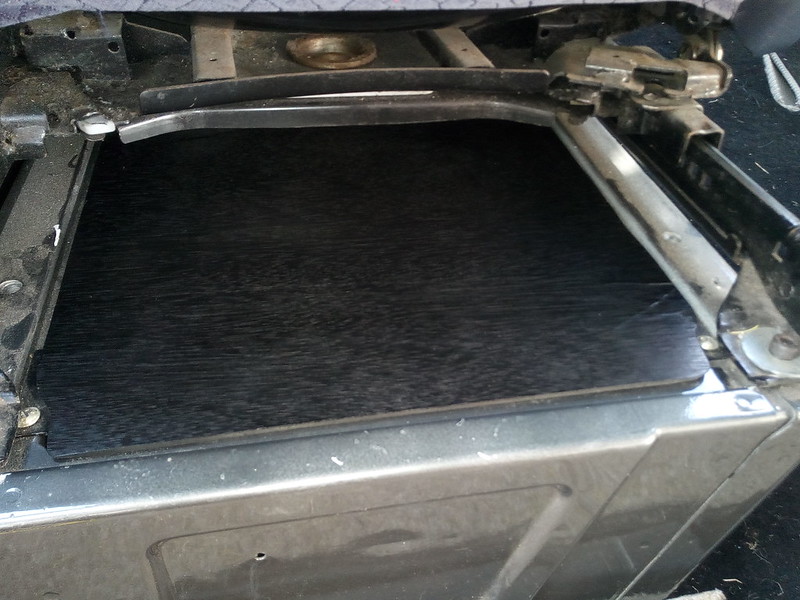
Ply Seat Base Cover in Place
by David, on Flickr

These Heaters come with a controller of course, but it is pot-luck to which one you actually get with the kit! My kit was shown with a fairly basic rotary controller, but I actually got an electronic LED unit
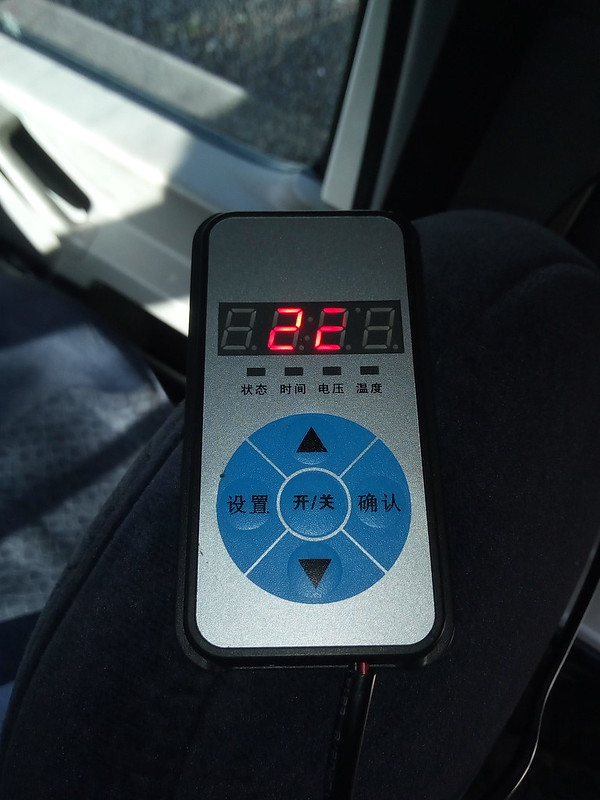
Heater Controller
by David, on Flickr
(due to the LED refresh, the digits don't show up properly in a photo)
Initial stumbling block as no instructions and buttons in Chinese, but now I have sussed it out, this controller is actually pretty good. It has a temp sensor in so you can set a target for the heater to go to; It also has a clock and you can set 2 timers for it to go and and off (it is just a 24 hour clock, no days, so you cannot set different profiles for say weekdays and weekends).
Overall ... nice unit. I have not yet worked out where to fit it (it has a holder it clips into so can be fixed to a wall say, and then unclipped and moved elsewhere. how useful that is I am not sure yet!)


OK, that concludes the Inside setup.
 

wildebus

Forum Member
Part 2: External Installation and Conclusions

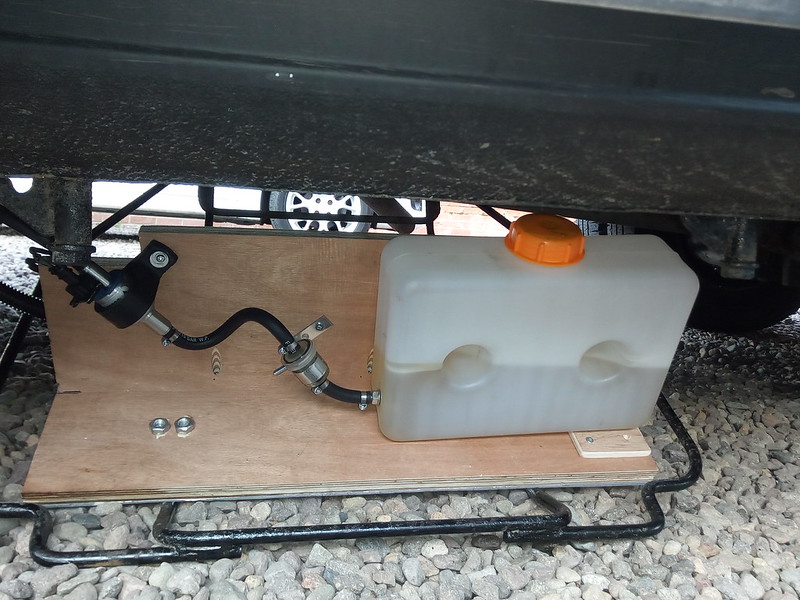
Now looking outside, I built a "Fuel Station" on a ply board (with protection underneath) which has a fuel tank, filter and pump all together.

Fuel Station on Carrier
by David, on Flickr
I will be running the heater on Kerosene for a number of reasons;
1) These heaters have been reported to run significantly cleaner and better on Kerosene compared to Road Diesel
2) I don't have to drop the fuel tank to fit a standpipe (this would be made sigificantly harder on my specific van as well due to the way the step was installed)
3) Kerosene is a lot cheaper than Road Diesel (50p ish vs £1.30ish per litre)

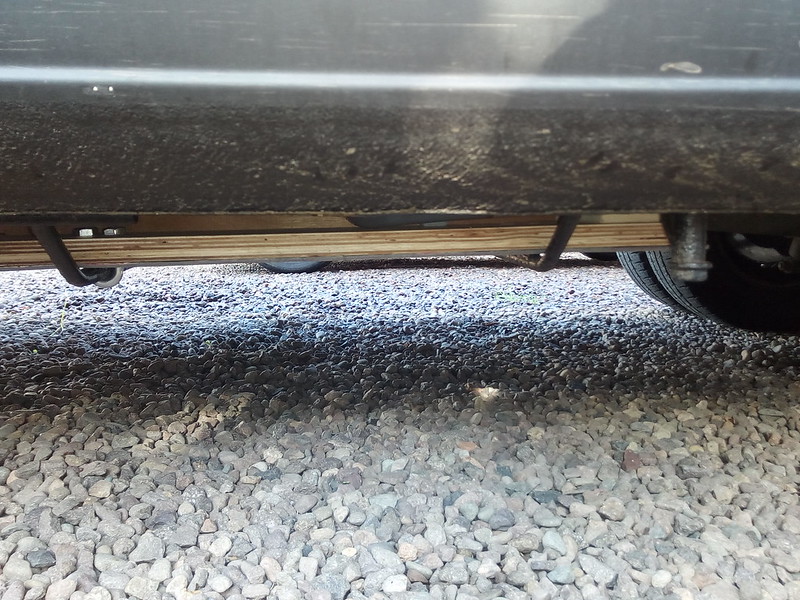
I am fitting this to the redundant spare wheel carrier, so is very easy to drop for refuelling and maintenance, and otherwise is just raised into position and is virtually invisible

Fuel Station Raised
by David, on Flickr.

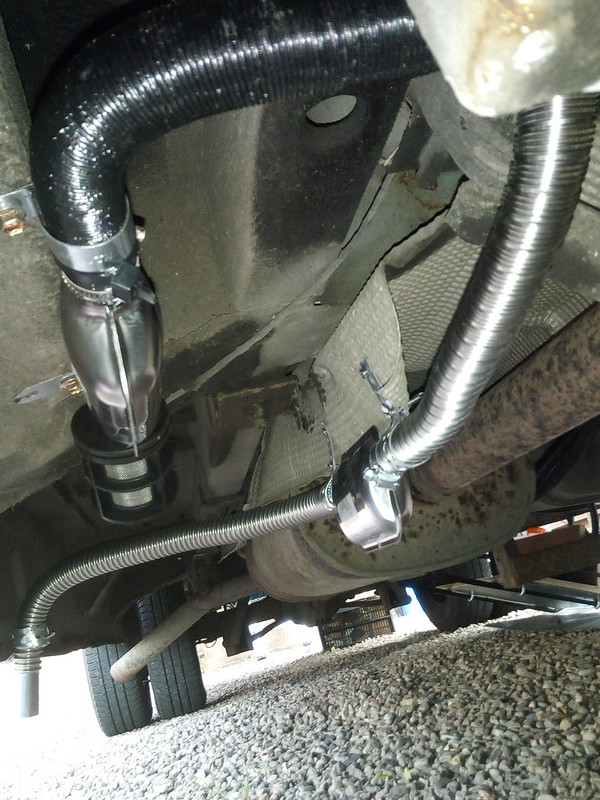
Moving to the Combustion area, you need Combustion Inlet and Exhaust.

Inlet & Exhaust Pipes
by David, on Flickr
The Inlet Pipe is the black one, and the Exhaust is the silver one.
These had to routed to avoid the vehicle exhaust (as did the fuel pipe and power of course) but wasn't too bad a job to do.

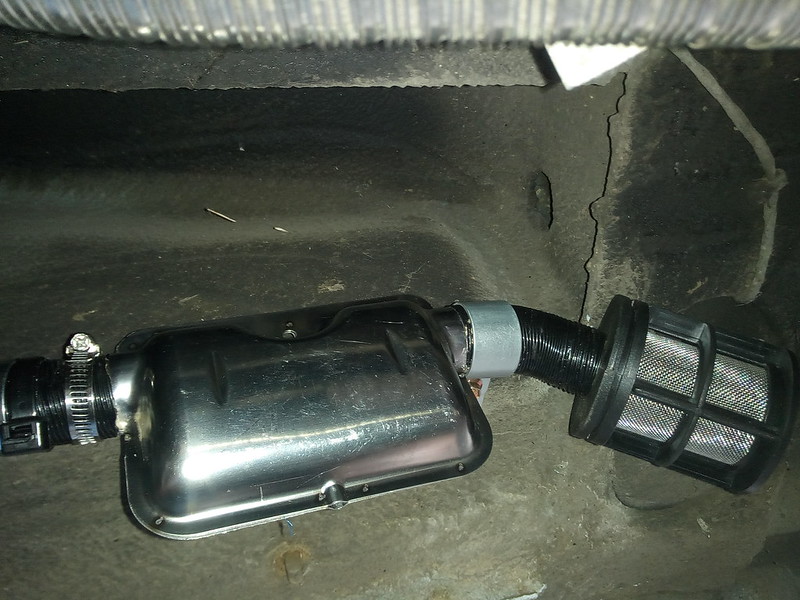
The Inlet Pipe comes with an Air Filter, which is a nice feature and not something you get on an Eberspacher.

Inlet Muffler
by David, on Flickr
Neither do you get an Silencer by default (on either product). It may seem odd fitting a silencer on an inlet pipe but these are surprisingly effective. Check out this video I made showing the difference with and without (listen from around 15 seconds in)

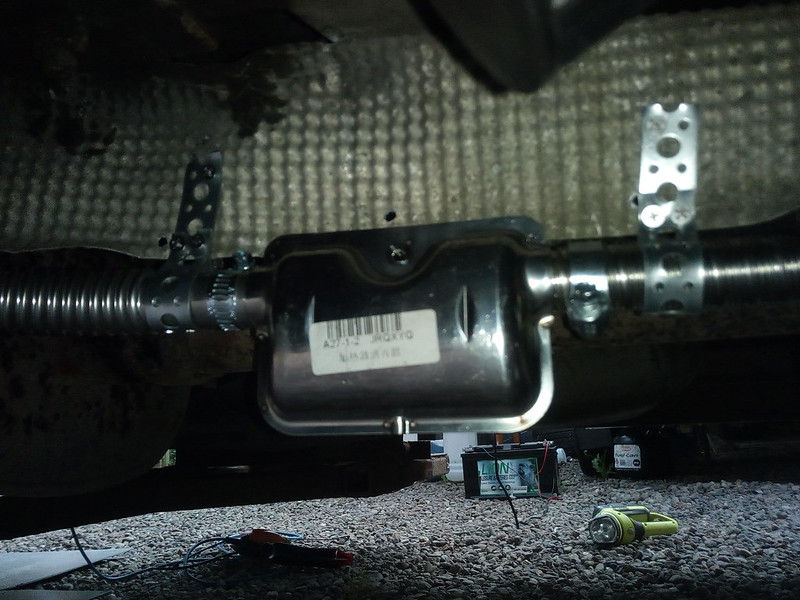
This is the Exhaust Muffler, supported with some home-made P-Clips

Exhaust Muffler
by David, on Flickr
Both of these Mufflers were bought separately in advance for this installation.


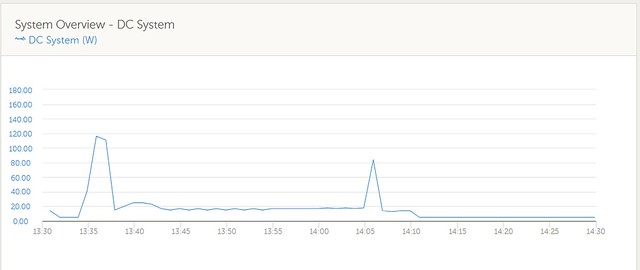
I have not checked the fuel useage yet, but in terms of Electrical Power, the heater draws around 11A in the first few minutes of use (mostly heating the Glow Pin I imagine) and then once running, draws just a few watts for the fan and pump.

Comparing this unit to the Eberspacher, it is to a degree 'you get what you pay for'.
We installed another one of these heaters a couple of weeks previously into a VW Shuttle and lessons learned from that install meant I bought replacement Jubilee Clips to repalce the poor quality ones supplied and some more rubber hose to use for joining pipework together. Also bought a length of Eberspacher exhaust as the supplied exhaust would not fit the silencers when cut.

I also tested this heater before installation and had to do some repairs as it would not run as delivered due to poor assembly. The casing is also very flexible which means the fan can easily rub (found this on both this heater and the one installed a fortnight ago). The Eberspacher casing from memory was much more solid.
So build and kit quality the Eber' wins, but have to bear in mind even replacing and supplementing parts it is still a saving in excess of £500.

I also found the heater stopped combusting after my first outing which was a little disappointing as you could imagine. I have not yet found the reason for that failure and am waiting for replacement parts to arrive from the supplier.
In the meantime I have fitted another one of these heaters (but using the same dosing pump, pipework and electrical loom) and which has been working ok with the testing I have carried out so far and really pumps out the heat.
 

wildebus

Forum Member
So some power information and an installation tip ...

Power Usage
A common question is how much power do these heaters use - they have an electric pump for the fuel, there is an electric fan to push the heat out and there is a glowpin (like a glowplug but smaller) that needs juice to heat up when the heater is first turned on.

There is a background load of 5W in the van (things like the Raspberry Pi, Fridge Temp Monitor and devices on standby), so that needs to be taken from power shown to get the Heater only power use.
I turned on the heater at 13:34 and told it to turn off at 14:05

Heater Running - Power
by David, on Flickr

From cold the Heater startup process always seems to be the glowpin turned on twice before the heater starts. Some kind of Preheat routine I guess? In the case above, the heater had been running earlier so only had the single glowpin-on activity.
The Heater Shutdown also creates a short spike in power as the glowpin comes on again prior to the heating turning off. I assume this is some kind of internal clean-up process for unburnt fuel, but I don't know for sure

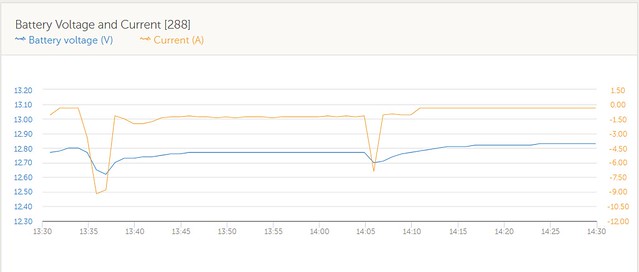
This is the same timeline, showing the Battery Voltage and Current draw

Heater Running - VoltAmp
by David, on Flickr

So the graph shows that once in normal running, the heater is using around 12Wh (1Ah) per hour once the background load is accounted for.
In terms of Fuel Economy, I found it uses around 0.125L/Hour running on Kerosene (I would imagine that Diesel would be the same).


Installation Tip
These heaters have a minimum voltage at which they can start up. This is fairly low and would not normally be a concern. However, they also have a tendency to under-report the voltage supply coming in - and in the 12V ELV (extra low voltage) DC systems as found in Campers and Motorhomes it represents a significant difference. On my Heater it is up to 0.5V lower than actual
Because of this 'feature', plus the voltage drop when the glowpin is energised, I would suggest the use of 4mm or possibly even 6mm cable if the battery is some distance in order to have as small a drop as possible at the heater input to minimise the drop when the glowpin is energised This also means shortening significantly the power line in the standard loom for both +12V and Ground as this is - as provided - pretty long and also fairly thin wire.
As can be seen from the graph above, when the Glow Pin was on, the Battery Bank Voltage dropped down to 12.62V, which is a perfectly healthy voltage; However the Heater read the voltage as 10.7V. This was partly due to the under-reporting of the voltage, but mostly due to the voltage drop on the cable, even though I was using 2.5mm cable. If the heater was turned on when the battery was at 12.3 or 12.4V, the heater may not have started.
The next installation of one of these heaters I do I will be using 4mm or 6mm as mentioned above and minimising the cable run - and would suggest to anyone fitting one of these heaters that they do the same.
 

Dowel

Forum Member
Thanks for posting this info
Would I be safe to assume you would recommend one of these Chinese heaters? Given the price compared to the established makers.
Any preferred supplier?
I expect a 2 kw one would suffice in our 5 metre long van.
 

wildebus

Forum Member
Thanks for posting this info
Would I be safe to assume you would recommend one of these Chinese heaters? Given the price compared to the established makers.
Any preferred supplier?
I expect a 2 kw one would suffice in our 5 metre long van.
Definately a 2kW would be large enough. one of the problems people have is not running the heater high enough often enough to give them a good clean (I guess like an "Italian tuneup" for heaters) - and if you ran the 5kW model, it would be on minimal setting all the time so would make the situation worse.

Would I recommend them? Bang for the Buck, I guess I would. I was happy with the quality of the 2nd one I got and what I paid (but even my new one is not 100% - the fan is rubbing and needs to have a little spacer added between heater and case to adjust it (the makers use bits of cardboard for this!))
I have actually got ANOTHER one from the same people, which arrived a couple of days ago. Plan is to check it all out and sell it as a pre-tested unit (there is a lot of worries about Faulty on Arrival units) or do a full sell & install with it for those folk who cannot install it themselves).
However ... If your budget allows it and you don't mind spending the extra, I would actually recommend the genuine Eberspacher D2 Airtronic to be honest. It has proper temperature control, a fan-only ventilation and better quality manufacturing. But having said that, you can buy 6 of these 'Chinese' Heaters for the price of a single Eberspacher! I worked out the amount I used my Eberspacher in my T5 for the duration I had it, it cost me over £50 a night - hence going for a cheaper option.
 

mistericeman

Forum Member
Pot luck by and large with the Chinese heaters...

I guess if you're only using it now and again then it might be worth a gamble (especially if you're handy with screwdrivers etc)

Personally speaking I went for a brand new eberspacher d2 on the basis we use the van all year around and I like to enjoy being warm when I want to be and not pfaff around with getting/keeping a heater running.
 

wildebus

Forum Member
Pot luck by and large with the Chinese heaters...

I guess if you're only using it now and again then it might be worth a gamble (especially if you're handy with screwdrivers etc)

Personally speaking I went for a brand new eberspacher d2 on the basis we use the van all year around and I like to enjoy being warm when I want to be and not pfaff around with getting/keeping a heater running.
In your situation, I would have done just the same.
There is a funny - but somewhat true - comment on a Heater FB group ... "You guys aren't buying a heater, you are buying a hobby".
Because the Chinese heaters are Identical to the Ebers in terms of mechanical connections, it is possible to replace one with an Eberspacher, justs changing the electric loom. The same is true in reverse of course, and with the price of Eber' spares costing more than a complete clone heater, quite a few folk are swapping out the Ebers

I did find when I went to start the Eber' D2 after a few months of non-use, it took a few goes to get it going again, so even the brand names are not immune from hassles.
 

trevskoda

Forum Member
I always thought the old caravan type heaters were good as no electric fans/motors wasting power were a better bet.
 

wildebus

Forum Member
I always thought the old caravan type heaters were good as no electric fans/motors wasting power were a better bet.
certainly something to be said about that :) how did they push the heat out? was it like a gas fire type thing? (I've never had a caravan!).
There is a heater that seems to be fairly popular in the US that has a catalytic plate that heats up of something? https://www.amazon.com/Camco-57331-...ng-20&linkId=e417ba4852d2e67974f823cd6631bf55
I tend to stay away from heaters like those gas ones that sit in the room - not so much from CO worries, but the amount of moisture they pump out is massive (used one in my first flat and the walls and windows got wet when I used it. not great)
 

Wissel

Forum Member
Just wondered how you're getting on with this heater?

Very tempted to order one myself. I'll be fitting a Propex, but as the van will be for fulltiming, I want a second heat source for redundancy. I like the idea of a diesel heater whilst driving as well.

PS - So pleased I read your thread on using a 240v fridge. Having lived with this setup now for a few months I think it's the best fridge I've ever owned, house or van. Plus it's so quiet and of course was much cheaper than most options. Thanks.
 

trevskoda

Forum Member
certainly something to be said about that :) how did they push the heat out? was it like a gas fire type thing? (I've never had a caravan!).
There is a heater that seems to be fairly popular in the US that has a catalytic plate that heats up of something? https://www.amazon.com/Camco-57331-...ng-20&linkId=e417ba4852d2e67974f823cd6631bf55
I tend to stay away from heaters like those gas ones that sit in the room - not so much from CO worries, but the amount of moisture they pump out is massive (used one in my first flat and the walls and windows got wet when I used it. not great)
Yes looks like a electric rad convector,ex is down through floor,works by convection drawing cool air in at bottom and hot rises out top.
 

wildebus

Forum Member
Just wondered how you're getting on with this heater?

Very tempted to order one myself. I'll be fitting a Propex, but as the van will be for fulltiming, I want a second heat source for redundancy. I like the idea of a diesel heater whilst driving as well.

PS - So pleased I read your thread on using a 240v fridge. Having lived with this setup now for a few months I think it's the best fridge I've ever owned, house or van. Plus it's so quiet and of course was much cheaper than most options. Thanks.
I am still not 100% sure TBH.

The first one never worked properly for some unknown reason. It might have coked up or it may have a technical fault? Still need to look at that.
The second one works but it doesn't like to fire up first time always. So takes around 15 minutes to start providing heat. Once it is running it certainly pushes out the heat so in that aspect it is good, but there is still the FUD factor of 'will it run?' in my mind currently.
My objective with my conversion was to get as good as conversion as possible but without being tied to the overpriced traditional options. Hence 240V fridge instead of 12V; and IKEA furniture instead of super-lightweight ply. And the cheap Chinese Heater instead of an Eberspacher was part of that ethos. The first two decisions worked out great and I'd do again no problems. The heater .... less of a "do it again in a heartbeat" decision.

What I can say is if the choice is between the Eberspacher at £700 odd for the full kit, or the Chinese heater at £130, you could go Chinese, if you don't like it you could get a cut-down Eberspacher kit, swap the actual heater itself out and reuse many parts like inlet and exhaust hoses, silencers, etc and maybe even end up saving money overall because of Eberspacher parts prices!

If I were paying someone the standard rate to supply and fit a Diesel heater I would go Eberspacher. The difference would be maybe just 20% when the guy has to cover potential warranty type stuff himself in the case of the Chinese heaters.
If I were fitting myself and the heater was not "mission critical", then I would buy the Chinese heater I did again, cross my fingers and think how much I have saved (over £500) by not buying Eber'.
 

trevskoda

Forum Member
Think i would go for the old caravan gas heat exchanger type heater with ex down through floor,no electric required.
 

wildebus

Forum Member
Following a discussion on wildcamping.co.uk (https://www.wildcamping.co.uk/forum...-base-/72826-eberspacher-stopped-working.html) I thought I would carry out a power and fuel consumption on the Diesel Heater I fitted to my Camperbus to see what it REALLY uses. After all, if you are building your own MotorHome and going to the trouble of fitting a Heater, you want to be able to have the resources to actually run the thing!

I'll post a link to the actual data and graphs later for those without a TL;DR issue, but this are the basic conclusions which may help on sizing Battery Power to cover the heating aspect

Vehicle:
6.3M LWB High-Top Panel Van Conversion. Windows all around (single glazed and uncovered); Lower panels insulated.

Start of Test:
Internal Living Area Temp: 2.3C
Battery Voltage: 12.41V (prior to heater ON)

End of Test:
Internal Living Area Temp: 21.5C
Battery Voltage: 12.37V (after heater OFF)

Results:
Test Duration: 3Hrs 23Mins
Total Power Consumption: 83.9Wh / 6.86Ah
Total Fuel Consumption: 0.75L

The Table below shows the power useage pattern

Diesel Power Test
by David, on Flickr
(Once Running the Heater uses 18Wh/Hour (1.5Ah/Hour))
I stopped the test at 21.5C - If I were to leave the heater running, I would have turned it down as 21C would be a comfortable temperature and the ongoing hourly fuel consumption would have been reduced. I don't believe the Elecrical Power Consumption would have changed significantly.
 
Last edited:

trevskoda

Forum Member
That fuel consumption is about a third of what a house boiler uses,thanks for taking time to post this very good info.
 

wildebus

Forum Member
That fuel consumption is about a third of what a house boiler uses,thanks for taking time to post this very good info.
Interesting that. I have an oil boiler as well (that's where I get my Kerosene from :) ) but never really checked. Just ordered 500L today (at a nearly 20% price hike from 8 months ago :( )
 

trevskoda

Forum Member
Interesting that. I have an oil boiler as well (that's where I get my Kerosene from :) ) but never really checked. Just ordered 500L today (at a nearly 20% price hike from 8 months ago :( )
I always buy 900ltrs as it works out cheaper,i live in a bungalow with full controls on heating,water rads seperate with stat in l/room and one on tank,room stat at 21c tank at 60c and never turn heating of as it does it its self,i use aprox 2200 ltrs a year depending of weather,i have tested switching of at night or when not at home,it burns slighty less if left on.
The problem of turning heating of and on is the fact that it takes a long time to heat the fabric of the house up which in turn throw heat back,where as turning on and of makes the boiler run hard to play catch up,it also burnes the ass out of boilers and yo yo style heating is not good for houses,ask at nat trust houses and to preserve the fabric of homes theres run at 15c as not to dry out old type plasters etc,to cold they crack and to hot they crack ,so our modered homes are ment to be heated steady and constant.
Im sure vans held at a steady temp would use less or equal amounts of fuel but be more pleasant to sit in rather than swim suit one minute next fur coats.
 
Last edited:

wildebus

Forum Member
I do usually buy more in a oner but planning on moving next year and not sure when so don't want to leave too much behind ;)

Think I use maybe 1500L a year? problem I have is sitting room has underfloor heating so takes a while to warm up but .... that room faces south with a pair of 8' wide patio doors so when the sun is out it hits 25C even in the winter so can never be sure about turning on that zone or not!
 

Users who viewed this discussion (Total:0)

Top